Transformer 是神经机器翻译领域的最新突破。自然语言非常复杂。一种语言中的一个词根据其上下文,可以在另一种语言中翻译成多个词。但上下文究竟是什么,以及如何让计算机理解上下文,一直是一个需要解决的重大问题。注意力机制的发明解决了如何将上下文编码到词中的问题,换句话说,如何将一个词及其上下文在数值向量中一起表示。Transformer 将这一点提升到了一个新的高度,使得我们可以仅使用注意力机制而无需循环结构来构建用于自然语言翻译的神经网络。这不仅使网络更简单、更容易训练,并且算法上易于并行化,而且还允许构建更复杂的语言模型。因此,我们可以看到计算机翻译的句子几乎完美无瑕。
事实上,如此强大的深度学习模型并不难构建。在 TensorFlow 和 Keras 中,几乎所有的构建模块都已现成可用,训练模型只需几个小时。看到 Transformer 模型构建和训练过程很有趣,看到训练好的模型能将句子从一种语言翻译成另一种语言更有趣。
在这个速成班中,您将按照与原始论文类似的设计来构建一个 Transformer 模型。
这是一篇内容丰富且重要的文章。您可能想把它加入书签。
让我们开始吧。

构建带注意力机制的 Transformer 模型(12 天迷你课程)。
照片由 Norbert Braun 拍摄,保留部分权利。
本速成课程适合谁?
在开始之前,请确保您来到了正确的地方。
本课程面向已熟悉 TensorFlow/Keras 的开发者。本课程中的内容假定您具备以下知识:
- 您知道如何构建自定义模型,包括 Keras 函数式 API
- 您知道如何在 Keras 中训练深度学习模型
- 您知道如何使用训练好的模型进行推理
您不需要是
- 一位自然语言处理专家
- 一位多语种使用者
这个速成班可以帮助您更深入地理解 Transformer 模型是什么以及它能做什么。
本速成班假定您已安装并配置好可用的 TensorFlow 2.10 环境。如果您在环境配置方面需要帮助,可以按照此处的逐步教程进行操作:
速成课程概览
本速成班分为 12 个课时。
您可以每天完成一节课(推荐),或者在一天内完成所有课程(硬核)。这真的取决于您的可用时间和热情程度。
以下是帮助您开始学习和了解 Transformer 模型构建的 12 个课时列表。
- 第 01 课:获取数据
- 第 02 课:文本规范化
- 第 03 课:向量化和创建数据集
- 第 04 课:位置编码矩阵
- 第 05 课:位置编码层
- 第 06 课:Transformer 构建块
- 第 07 课:Transformer 编码器和解码器
- 第 08 课:构建 Transformer
- 第 09 课:准备 Transformer 模型进行训练
- 第 10 课:训练 Transformer
- 第 11 课:Transformer 模型推理
- 第 12 课:改进模型
每个课时可能需要您 15 到 60 分钟的时间。请花时间按照自己的节奏完成课程。随时提问,甚至可以在线上的评论区分享您的成果。
课程内容可能会要求您自行查找某些操作的方法。本指南会提供一些提示,但即使您只是遵循课程中的代码,也能完成一个相当不错的 Transformer 模型。
在评论中发布您的结果;我会为您加油!
坚持下去;不要放弃。
第 01 课:获取数据
在构建神经机器翻译器的过程中,您需要数据来进行训练和测试。让我们来构建一个基于句子的英法翻译器。互联网上有很多资源。例如,可以用于闪卡应用程序 Anki 的用户贡献数据。您可以在 https://ankiweb.net/shared/decks/french 下载一些数据文件。数据文件将是一个 ZIP 文件,其中包含一个 SQLite 数据库文件,您可以从中提取英法句子对。
但是,您可能会发现文本文件版本更方便,可以在 https://www.manythings.org/anki/ 找到。Google 也托管了该文件的镜像,我们将在本次中使用它。
我们将使用它。
下面的代码将下载压缩的数据文件并进行解压
|
1 2 3 4 5 6 7 8 9 10 11 12 13 |
import pathlib import tensorflow as tf # 下载 Anki 提供的数据集:https://www.manythings.org/anki/ text_file = tf.keras.utils.get_file( fname="fra-eng.zip", origin="http://storage.googleapis.com/download.tensorflow.org/data/fra-eng.zip", extract=True, ) # 显示文件当前位置 text_file = pathlib.Path(text_file).parent / "fra.txt" print(text_file) |
数据文件将是一个名为 fra.txt 的纯文本文件。其格式为:
|
1 |
<英文句子><制表符><法文句子> |
您的任务
尝试运行上面的代码并打开解压后的文件。您应该会验证每行的格式都如上所示。
在下一课中,您将处理此文件并准备适合训练和测试的数据集。
第 02 课:文本规范化
与所有 NLP 任务一样,在使用文本之前需要对其进行规范化。法语字母带有重音符号,这些重音符号会表示为 Unicode 字符,但在 Unicode 中的表示方式并不唯一。因此,您会将字符串转换为 NFKC(兼容性与组合规范化形式)。
接下来,您将对句子进行分词。每个单词以及每个标点符号都应成为一个单独的标记。但是,像 don’t、va-t-il 或 c’est 这样的缩略语中使用的标点符号并未与单词分开。此外,将所有内容转换为小写,以期减少词汇表中不同词的数量。
规范化和分词可以更深入,例如子词分词、词干提取和词形还原。但为了简单起见,本项目不做这些。
从头开始,用于规范化文本的代码如下。您将使用 Python 模块 unicodedata 将 Unicode 字符串转换为 NFKC 规范形式。然后,您将使用正则表达式在标点符号周围添加空格。之后,您将用哨兵标记 [start] 和 [end] 包装法语句子(即目标语言)。您将在后续课程中看到这些哨兵标记的用途。
|
1 2 3 4 5 6 7 8 9 10 11 12 13 14 15 16 17 18 19 20 21 22 23 24 25 26 27 28 29 30 31 32 33 34 35 36 37 |
import pathlib import pickle import random import re import unicodedata import tensorflow as tf # 下载 Anki 提供的数据集:https://www.manythings.org/anki/ text_file = tf.keras.utils.get_file( fname="fra-eng.zip", origin="http://storage.googleapis.com/download.tensorflow.org/data/fra-eng.zip", extract=True, ) text_file = pathlib.Path(text_file).parent / "fra.txt" def normalize(line): """规范化一行文本并在制表符处分成两部分""" line = unicodedata.normalize("NFKC", line.strip().lower()) line = re.sub(r"^([^ \w])(?!\s)", r"\1 ", line) line = re.sub(r"(\s[^ \w])(?!\s)", r"\1 ", line) line = re.sub(r"(?!\s)([^ \w])$", r" \1", line) line = re.sub(r"(?!\s)([^ \w]\s)", r" \1", line) eng, fra = line.split("\t") fra = "[start] " + fra + " [end]" return eng, fra # 规范化每一行并分成英语和法语 with open(text_file) as fp: text_pairs = [normalize(line) for line in fp] # 打印一些样本 for _ in range(5): print(random.choice(text_pairs)) with open("text_pairs.pickle", "wb") as fp: pickle.dump(text_pairs, fp) |
运行后,您应该会看到一些样本结果,例如:
|
1 2 3 4 5 |
('where did you put your key ?', '[start] où est-ce tu as mis ta clé ? [end]') ('you missed a spot .', '[start] tu as loupé une tache . [end]') ("i think we're being followed .", '[start] je pense que nous sommes suivis . [end]') ('i bought a cactus .', "[start] j'ai acheté un cactus . [end]") ('i have more than enough .', "[start] j'en ai plus que marre . [end]") |
我们将规范化后的句子对保存在 pickle 文件中,以便在后续步骤中重用。
当您将其用于模型时,您会想了解有关此数据集的一些统计信息。特别是,您想知道每种语言中有多少个不同的标记(单词)以及句子的长度。您可以通过以下方式确定这些信息:
|
1 2 3 4 5 6 7 8 9 10 11 12 13 14 15 16 17 18 19 |
import pickle with open("text_pairs.pickle", "rb") as fp: text_pairs = pickle.load(fp) # 计算标记数量 eng_tokens, fra_tokens = set(), set() eng_maxlen, fra_maxlen = 0, 0 for eng, fra in text_pairs: eng_tok, fra_tok = eng.split(), fra.split() eng_maxlen = max(eng_maxlen, len(eng_tok)) fra_maxlen = max(fra_maxlen, len(fra_tok)) eng_tokens.update(eng_tok) fra_tokens.update(fra_tok) print(f"总英语标记数:{len(eng_tokens)}") print(f"总法语标记数:{len(fra_tokens)}") print(f"最长英语句子长度:{eng_maxlen}") print(f"最长法语句子长度:{fra_maxlen}") print(f"总对数:{len(text_pairs)}") |
您的任务
运行上面的代码。查看样本句子以及您收集的统计数据。记住这些输出,它们将在下一课中很有用。此外,知道句子的最大长度不如知道它们的分布有用。您应该绘制直方图来查看它们。尝试一下,生成下面的图表:
|
1 2 3 4 5 6 7 8 9 10 11 12 13 14 15 16 17 18 19 20 |
import pickle import matplotlib.pyplot as plt with open("text_pairs.pickle", "rb") as fp: text_pairs = pickle.load(fp) # 标记长度的句子长度直方图 en_lengths = [len(eng.split()) for eng, fra in text_pairs] fr_lengths = [len(fra.split()) for eng, fra in text_pairs] plt.hist(en_lengths, label="en", color="red", alpha=0.33) plt.hist(fr_lengths, label="fr", color="blue", alpha=0.33) plt.yscale("log") # 句子长度符合本福特定律 plt.ylim(plt.ylim()) # 使两个图的 Y 轴保持一致 plt.plot([max(en_lengths), max(en_lengths)], plt.ylim(), color="red") plt.plot([max(fr_lengths), max(fr_lengths)], plt.ylim(), color="blue") plt.legend() plt.title("样本数量 vs 标记长度") plt.show() |

不同语言的句子长度
在下一课中,您将对这些规范化后的文本数据进行向量化并创建数据集。
第 03 课:向量化和创建数据集
在前一课中,您清理了句子,但它们仍然是文本。神经网络只能处理数字。将文本转换为数字的一种方法是通过向量化。这意味着将文本中的标记转换为整数。因此,一个包含 $n$ 个标记(单词)的句子将变成一个包含 $n$ 个整数的向量。
您可以构建自己的向量化器。只需构建一个将每个唯一标记映射到唯一整数的映射表。使用时,您可以逐个查找表中的标记,并将整数以向量形式返回。
在 Keras 中,您可以使用 TextVectorization 层来为我们节省构建向量化器的精力。它支持填充,即整数 0 保留用于表示“空”。当您输入一个有 $m < n$ 个标记的句子,但希望向量化器始终返回一个固定长度为 $n$ 的向量时,这很有用。
您将首先将句子对拆分为训练集、验证集和测试集,因为您在模型训练中需要用到它们。然后,创建一个 TextVectorization 层并将其适配到训练集(因为在模型训练完成之前,您不应查看验证集或测试集)。
|
1 2 3 4 5 6 7 8 9 10 11 12 13 14 15 16 17 18 19 20 21 22 23 24 25 26 27 28 29 30 31 32 33 34 35 36 37 38 39 40 41 42 43 44 45 46 47 48 49 50 51 52 53 54 55 56 |
import pickle import random from tensorflow.keras.layers import TextVectorization # 加载规范化后的句子对 with open("text_pairs.pickle", "rb") as fp: text_pairs = pickle.load(fp) # 对随机化的句子对进行训练-测试-验证集拆分 random.shuffle(text_pairs) n_val = int(0.15*len(text_pairs)) n_train = len(text_pairs) - 2*n_val train_pairs = text_pairs[:n_train] val_pairs = text_pairs[n_train:n_train+n_val] test_pairs = text_pairs[n_train+n_val:] # 根据输入数据分析确定的参数 vocab_size_en = 10000 vocab_size_fr = 20000 seq_length = 20 # 创建向量化器 eng_vectorizer = TextVectorization( max_tokens=vocab_size_en, standardize=None, split="whitespace", output_mode="int", output_sequence_length=seq_length, ) fra_vectorizer = TextVectorization( max_tokens=vocab_size_fr, standardize=None, split="whitespace", output_mode="int", output_sequence_length=seq_length + 1 ) # 使用训练数据集训练向量化层 train_eng_texts = [pair[0] for pair in train_pairs] train_fra_texts = [pair[1] for pair in train_pairs] eng_vectorizer.adapt(train_eng_texts) fra_vectorizer.adapt(train_fra_texts) # 为后续步骤保存 with open("vectorize.pickle", "wb") as fp: data = { "train": train_pairs, "val": val_pairs, "test": test_pairs, "engvec_config": eng_vectorizer.get_config(), "engvec_weights": eng_vectorizer.get_weights(), "fravec_config": fra_vectorizer.get_config(), "fravec_weights": fra_vectorizer.get_weights(), } pickle.dump(data, fp) |
请注意,TextVectorization 对象的 max_tokens 参数可以省略,让向量化器自行确定。但如果您将其设置为小于总词汇量的某个值(如本例),则会限制向量化器仅学习更频繁的单词,并将稀有单词视为词汇表外(OOV)。这有助于跳过价值不高或拼写错误的单词。您还可以固定向量化器的输出长度。我们在上面假定一个句子不应超过 20 个标记。
下一步将是利用向量化器并创建一个 TensorFlow Dataset 对象。这将在您后续的步骤中用于训练我们的模型。
|
1 2 3 4 5 6 7 8 9 10 11 12 13 14 15 16 17 18 19 20 21 22 23 24 25 26 27 28 29 30 31 32 33 34 35 36 37 38 39 40 41 42 43 44 45 46 47 48 49 50 51 52 53 54 55 56 57 58 |
import pickle import tensorflow as tf from tensorflow.keras.layers import TextVectorization # 加载文本数据和向量化器权重 with open("vectorize.pickle", "rb") as fp: data = pickle.load(fp) train_pairs = data["train"] val_pairs = data["val"] test_pairs = data["test"] # 未使用 eng_vectorizer = TextVectorization.from_config(data["engvec_config"]) eng_vectorizer.set_weights(data["engvec_weights"]) fra_vectorizer = TextVectorization.from_config(data["fravec_config"]) fra_vectorizer.set_weights(data["fravec_weights"]) # 设置 Dataset 对象 def format_dataset(eng, fra): """接收一对英语和法语句子,转换为输入和目标。 输入是一个字典,包含键 `encoder_inputs` 和 `decoder_inputs`,每个 都是一个向量,分别对应英语和法语句子。 目标也是法语句子的向量,向前移动 1 个 token。所有 向量的长度相同。 输出将用于训练 Transformer 模型。在我们创建的模型中, 输入张量命名为 `encoder_inputs` 和 `decoder_inputs`, 它们应该与源部分的字典中的键相匹配。 """ eng = eng_vectorizer(eng) fra = fra_vectorizer(fra) source = {"encoder_inputs": eng, "decoder_inputs": fra[:, :-1]} target = fra[:, 1:] return (source, target) def make_dataset(pairs, batch_size=64): """为句子对创建 TensorFlow Dataset""" # 使用 zip(*pairs) 聚合句子 eng_texts, fra_texts = zip(*pairs) # 将它们转换为列表,然后创建张量 dataset = tf.data.Dataset.from_tensor_slices((list(eng_texts), list(fra_texts))) return dataset.shuffle(2048) \ .batch(batch_size).map(format_dataset) \ .prefetch(16).cache() train_ds = make_dataset(train_pairs) val_ds = make_dataset(val_pairs) # 测试数据集 for inputs, targets in train_ds.take(1): print(f'inputs["encoder_inputs"].shape: {inputs["encoder_inputs"].shape}') print(f'inputs["encoder_inputs"][0]: {inputs["encoder_inputs"][0]}') print(f'inputs["decoder_inputs"].shape: {inputs["decoder_inputs"].shape}') print(f'inputs["decoder_inputs"][0]: {inputs["decoder_inputs"][0]}') print(f"targets.shape: {targets.shape}") print(f"targets[0]: {targets[0]}") |
稍后您将重用此代码来创建 `train_ds` 和 `val_ds` 数据集对象。
您的任务
运行上述代码。验证您是否看到了与以下内容类似的输出:
|
1 2 3 4 5 6 7 8 9 |
inputs["encoder_inputs"].shape: (64, 20) inputs["encoder_inputs"][0]: [142 8 263 979 2 0 0 0 0 0 0 0 0 0 0 0 0 0 0 0] inputs["decoder_inputs"].shape: (64, 20) inputs["decoder_inputs"][0]: [ 2 15 2496 190 4 3 0 0 0 0 0 0 0 0 0 0 0 0 0 0] targets.shape: (64, 20) targets[0]: [ 15 2496 190 4 3 0 0 0 0 0 0 0 0 0 0 0 0 0 0 0] |
确切的向量可能不同,但您应该看到形状都应该是(batch size, sequence length)。上面的部分代码是从 François Chollet 的教程《使用序列到序列 Transformer 进行英汉翻译》中借用的。您也可以看看他的 Transformer 实现与本迷你课程有何不同。
在下一课中,我们将讨论位置编码。
第 04 课:位置编码矩阵
当一个句子被向量化时,您会得到一个整数向量,其中每个整数代表一个单词。这里的整数只是一个标签。我们不能假设两个整数越接近,它们所代表的单词就越相关。
为了理解单词的含义,从而量化两个单词之间的关系,您将使用 **词嵌入** 技术。但是要理解上下文,您还需要知道每个单词在句子中的位置。这通过 **位置编码** 来完成。
在论文《Attention Is All You Need》中,位置编码用一个向量表示每个 token 的位置。向量的元素是正弦波的不同相位和频率的值。具体来说,在位置 $k=0, 1, \cdots, L-1$,位置编码向量(长度为 $d$)为
$$
[P(k,0), P(k,1), \cdots, P(k,d-2), P(k,d-1)]
$$
其中对于 $i=0, 1, \cdots, d/2$,
$$
\begin{aligned}
P(k, 2i) &= \sin\Big(\frac{k}{n^{2i/d}}\Big) \\
P(k, 2i+1) &= \cos\Big(\frac{k}{n^{2i/d}}\Big)
\end{aligned}
$$
在论文中,他们使用了 $n=10000$。
实现位置编码并不困难,尤其是如果您可以使用 NumPy 的向量函数。
|
1 2 3 4 5 6 7 8 9 10 11 12 13 14 15 16 17 18 19 20 21 22 23 24 25 26 27 28 29 30 31 32 33 34 35 36 37 38 39 40 41 |
import pickle import matplotlib.pyplot as plt import numpy as np def pos_enc_matrix(L, d, n=10000): """创建位置编码矩阵 参数 L: 输入维度(长度) d: 输出维度(深度),必须是偶数 n: 正弦函数的常数 返回 L-by-d 的浮点数 NumPy 矩阵。在元素 (k,2i) 处的值 为 sin(k/n^(2i/d)),而在元素 (k,2i+1) 处的值为 cos(k/n^(2i/d)) """ assert d % 2 == 0, "输出维度需要是一个偶数" d2 = d//2 P = np.zeros((L, d)) k = np.arange(L).reshape(-1, 1) # L 列向量 i = np.arange(d2).reshape(1, -1) # d 行向量 denom = np.power(n, -i/d2) # n**(-2*i/d) args = k * denom # (L,d) 矩阵 P[:, ::2] = np.sin(args) P[:, 1::2] = np.cos(args) return P # 绘制位置编码矩阵 pos_matrix = pos_enc_matrix(L=2048, d=512) assert pos_matrix.shape == (2048, 512) plt.pcolormesh(pos_matrix, cmap='RdBu') plt.xlabel('深度') plt.ylabel('位置') plt.colorbar() plt.show() with open("posenc-2048-512.pickle", "wb") as fp: pickle.dump(pos_matrix, fp) |
可以看到,我们创建了一个生成位置编码的函数。上面我们用 $L=2048$ 和 $d=512$ 对其进行了测试。输出将是一个 $2048\times 512$ 的矩阵。我们还将编码绘制成了热力图。它看起来应该像这样。
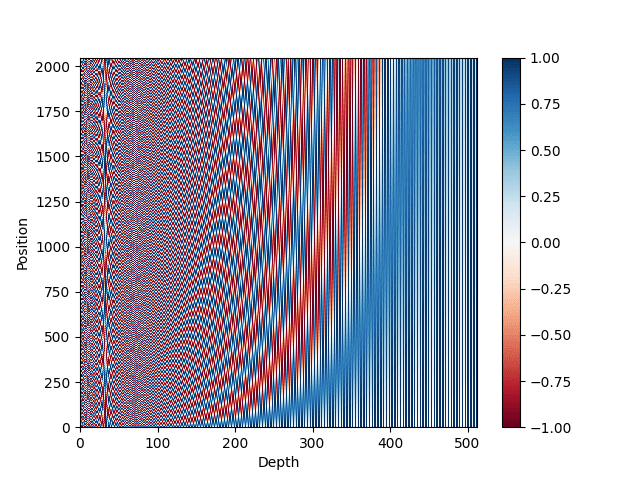
位置编码矩阵的热力图表示
您的任务
上面的热力图可能对您来说不太吸引人。更好的可视化方法是分离正弦曲线和余弦曲线。尝试使用下面的代码重用已保存的位置编码矩阵,并获得更清晰的可视化。
|
1 2 3 4 5 6 7 8 9 10 11 12 13 14 15 |
import pickle import matplotlib.pyplot as plt import numpy as np with open("posenc-2048-512.pickle", "rb") as fp: pos_matrix = pickle.load(fp) assert pos_matrix.shape == (2048, 512) # 绘制位置编码矩阵,另一种方式 plt.pcolormesh(np.hstack([pos_matrix[:, ::2], pos_matrix[:, 1::2]]), cmap='RdBu') plt.xlabel('深度') plt.ylabel('位置') plt.colorbar() plt.show() |
如果您愿意,可以检查矩阵中的不同“深度”是否代表不同频率的正弦曲线。一个可视化它们的例子如下:
|
1 2 3 4 5 |
... plt.plot(pos_matrix[:, 155], label="高频") plt.plot(pos_matrix[:, 300], label="低频") plt.legend() plt.show() |
但是,如果您可视化矩阵的一个“位置”,您会看到一条有趣的曲线。
|
1 2 3 4 5 6 7 8 9 10 |
import pickle import matplotlib.pyplot as plt with open("posenc-2048-512.pickle", "rb") as fp: pos_matrix = pickle.load(fp) assert pos_matrix.shape == (2048, 512) # 绘制来自不同位置的两条曲线 plt.plot(pos_matrix[100], alpha=0.66, color="red", label="位置 100") plt.legend() plt.show() |
这显示了如下内容:
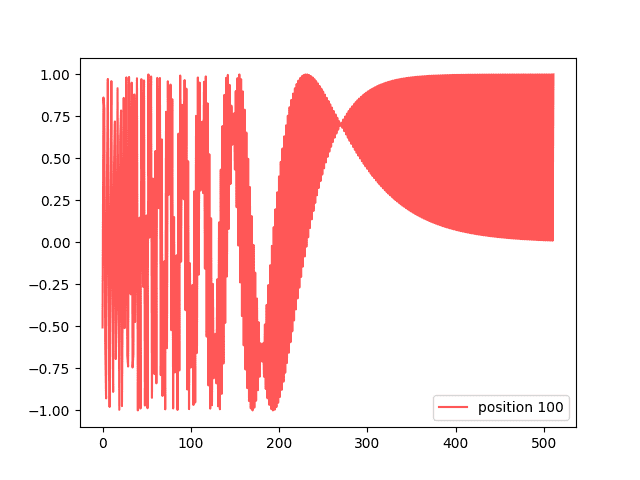
一个编码向量
编码矩阵的有用之处在于,当您比较两个编码向量时,您可以得知它们的位置相距多远。两个归一化向量的点积如果它们相同则为 1,如果它们相距较远则迅速下降。这种关系可以用下图来可视化:
|
1 2 3 4 5 6 7 8 9 10 11 12 13 14 15 16 |
import pickle import matplotlib.pyplot as plt import numpy as np with open("posenc-2048-512.pickle", "rb") as fp: pos_matrix = pickle.load(fp) assert pos_matrix.shape == (2048, 512) # 显示不同归一化位置向量之间的点积 pos_matrix /= np.linalg.norm(pos_matrix, axis=1, keepdims=True) p = pos_matrix[789] # 所有向量与位置 789 的向量进行比较 dots = pos_matrix @ p plt.plot(dots) plt.ylim([0, 1]) plt.show() |
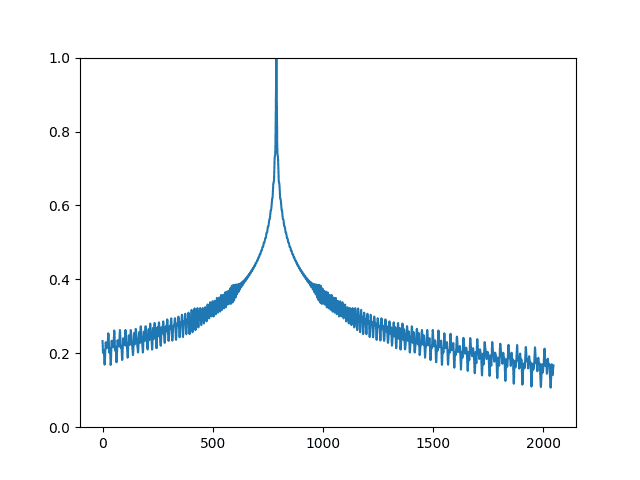
归一化位置编码向量的点积
在下一课中,您将使用位置编码矩阵在 Keras 中构建一个位置编码层。
第 05 课:位置编码层
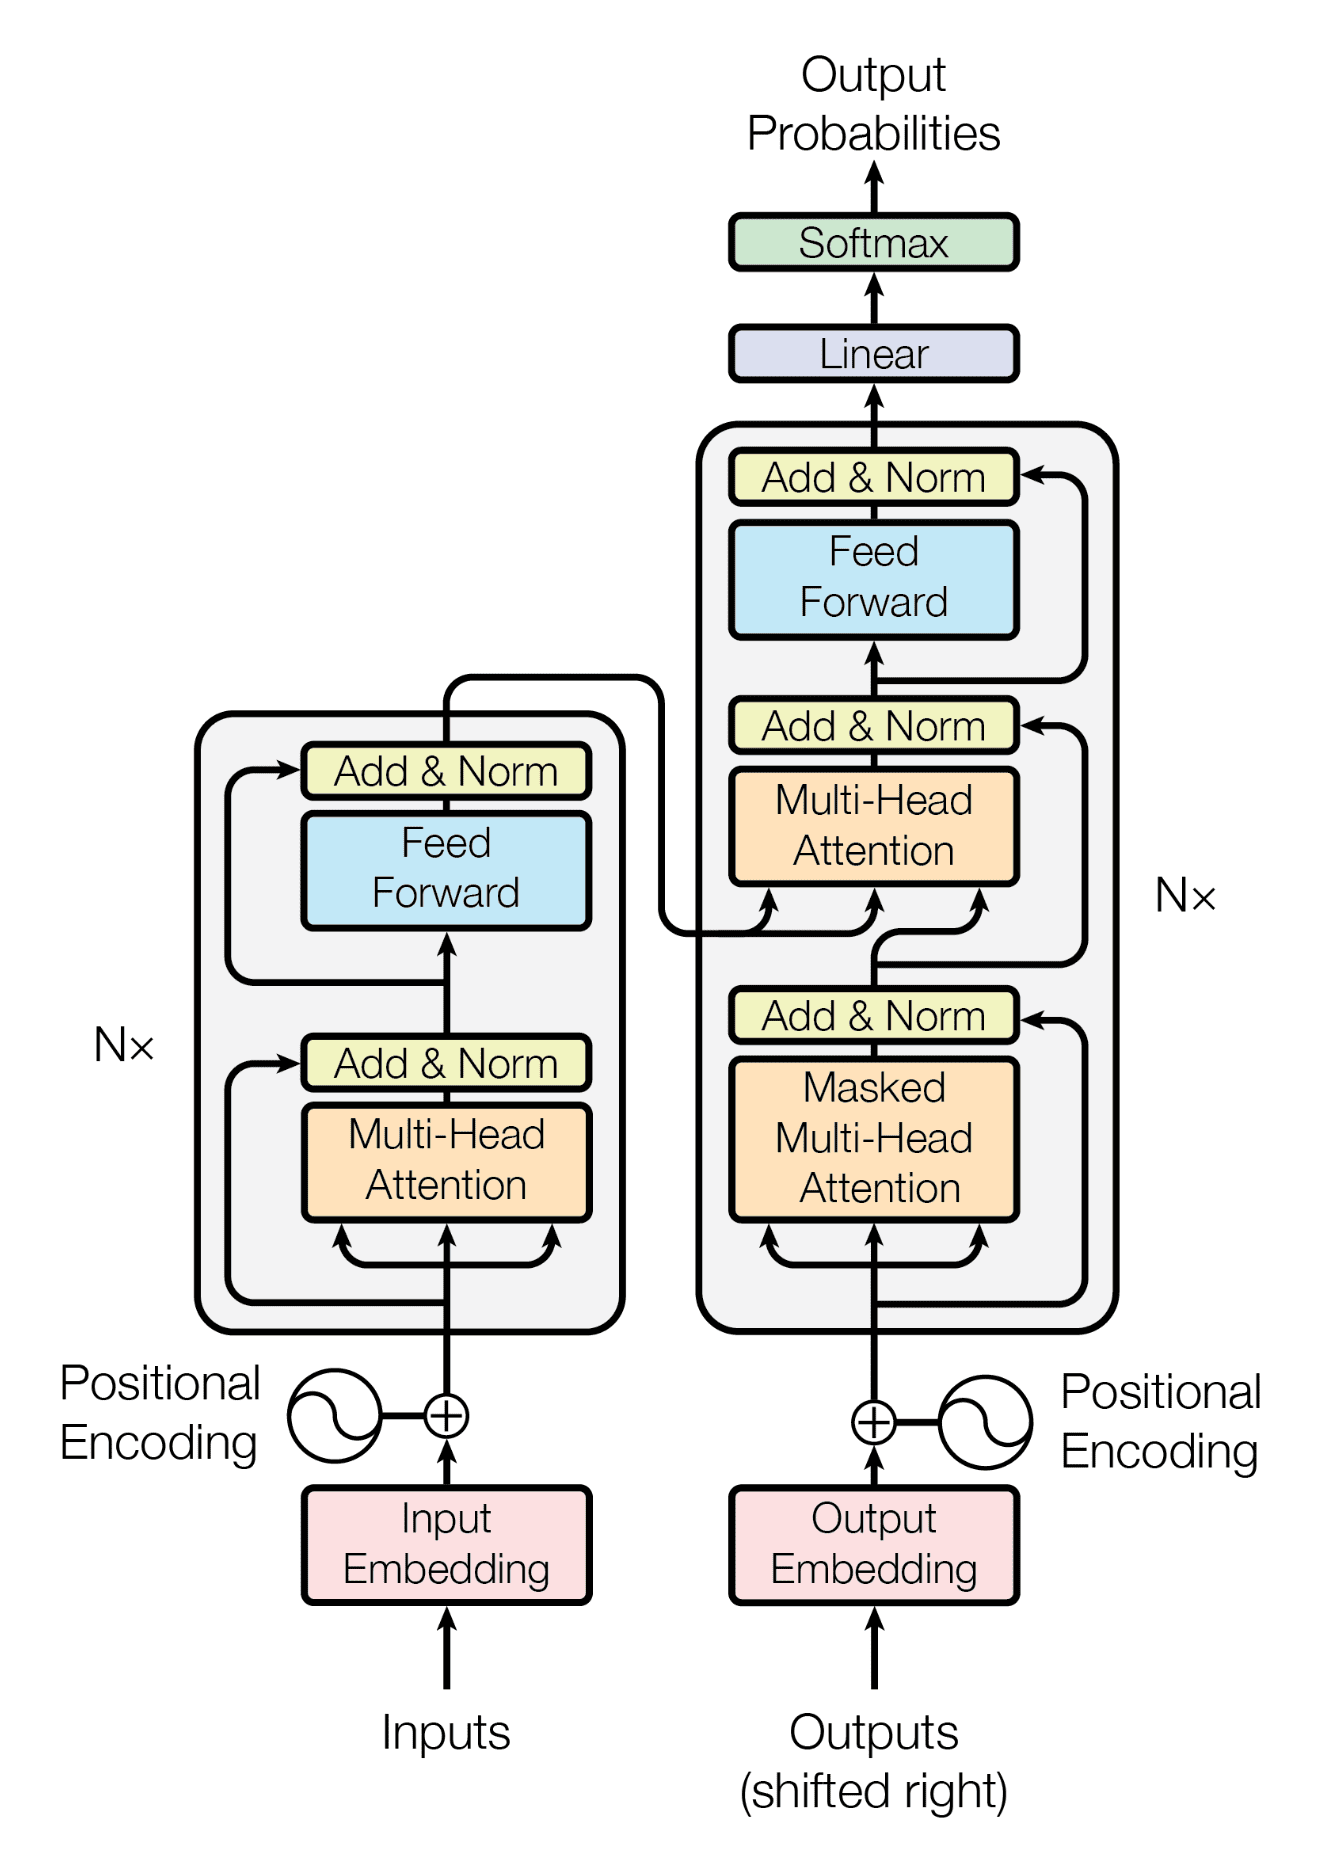
Transformer 模型
论文《Attention Is All You Need》中的 Transformer 模型如下图所示:
位置编码层位于 Transformer 模型 的入口点。但是,Keras 库没有提供现成的。您可以创建一个自定义层来实现位置编码,如下所示。
|
1 2 3 4 5 6 7 8 9 10 11 12 13 14 15 16 17 18 19 20 21 22 23 24 25 26 27 28 29 30 31 32 33 34 35 36 37 38 39 40 41 42 43 44 45 46 47 48 49 50 51 52 53 54 55 56 57 58 59 60 61 62 63 64 65 66 67 68 |
import numpy as np import tensorflow as tf def pos_enc_matrix(L, d, n=10000): """创建位置编码矩阵 参数 L: 输入维度(长度) d: 输出维度(深度),必须是偶数 n: 正弦函数的常数 返回 L-by-d 的浮点数 NumPy 矩阵。在元素 (k,2i) 处的值 为 sin(k/n^(2i/d)),而在元素 (k,2i+1) 处的值为 cos(k/n^(2i/d)) """ assert d % 2 == 0, "输出维度需要是一个偶数" d2 = d//2 P = np.zeros((L, d)) k = np.arange(L).reshape(-1, 1) # L 列向量 i = np.arange(d2).reshape(1, -1) # d 行向量 denom = np.power(n, -i/d2) # n**(-2*i/d) args = k * denom # (L,d) 矩阵 P[:, ::2] = np.sin(args) P[:, 1::2] = np.cos(args) return P class PositionalEmbedding(tf.keras.layers.Layer): """位置嵌入层。假定输入是 token 化的,转换为 嵌入,并返回位置编码的输出。""" def __init__(self, sequence_length, vocab_size, embed_dim, **kwargs): """ 参数 sequence_length: 输入序列长度 vocab_size: 输入词汇量大小,用于设置嵌入矩阵 embed_dim: 嵌入向量大小,用于设置嵌入矩阵 """ super().__init__(**kwargs) self.sequence_length = sequence_length self.vocab_size = vocab_size self.embed_dim = embed_dim # 论文中的 d_model # token 嵌入层:将整数 token 转换为 D 维浮点向量 self.token_embeddings = tf.keras.layers.Embedding( input_dim=vocab_size, output_dim=embed_dim, mask_zero=True ) # 位置嵌入层:一个硬编码的正弦值矩阵 matrix = pos_enc_matrix(sequence_length, embed_dim) self.position_embeddings = tf.constant(matrix, dtype="float32") def call(self, inputs): """输入 tokens 转换为嵌入向量,然后叠加 位置向量""" embedded_tokens = self.token_embeddings(inputs) return embedded_tokens + self.position_embeddings # 此层使用 Embedding 层,它可以接受掩码 # 参见 https://tensorflowcn.cn/guide/keras/masking_and_padding#passing_mask_tensors_directly_to_layers def compute_mask(self, *args, **kwargs): return self.token_embeddings.compute_mask(*args, **kwargs) def get_config(self): # 使保存和加载使用自定义层的模型成为可能 config = super().get_config() config.update({ "sequence_length": self.sequence_length, "vocab_size": self.vocab_size, "embed_dim": self.embed_dim, }) return config |
此层确实结合了嵌入层和位置编码。嵌入层创建词嵌入,即,将矢量化句子中的整数标记标签转换为可以承载词语含义的向量。通过嵌入,您可以了解两个不同词语在含义上的接近程度。
嵌入的输出取决于分词后的输入句子。但是位置编码是一个常数矩阵,因为它仅取决于位置。因此,您在创建此层时为其创建了一个常数张量。TensorFlow足够智能,可以在call()函数中将嵌入输出添加到位置编码矩阵时匹配维度。
上面的层中定义了另外两个函数。compute_mask()函数会传递给嵌入层。这对于告知输出的哪些位置被填充是必需的。Keras将在内部使用它。get_config()函数用于记住此层的所有配置参数。这是Keras的标准做法,以便您可以记住传递给构造函数的所有参数,并在get_config()中返回它们,从而可以保存和加载模型。
您的任务
将以上代码与Lesson 03中创建的数据集train_ds和下面的代码片段结合起来
|
1 2 3 4 5 6 7 8 9 10 11 12 13 |
# 来自 Lesson 03 # train_ds = make_dataset(train_pairs) vocab_size_en = 10000 seq_length = 20 # 测试数据集 for inputs, targets in train_ds.take(1): print(inputs["encoder_inputs"]) embed_en = PositionalEmbedding(seq_length, vocab_size_en, embed_dim=512) en_emb = embed_en(inputs["encoder_inputs"]) print(en_emb.shape) print(en_emb._keras_mask) |
您应该看到如下输出
|
1 2 3 4 5 6 7 8 9 10 11 12 13 14 15 16 17 |
tf.Tensor( [[ 10 4288 607 ... 0 0 0] [ 28 14 4 ... 0 0 0] [ 63 23 430 ... 2 0 0] ... [ 136 315 100 ... 0 0 0] [ 3 20 19 ... 0 0 0] [ 44 16 6 ... 0 0 0]], shape=(64, 20), dtype=int64) (64, 20, 512) tf.Tensor( [[ True True True ... False False False] [ True True True ... False False False] [ True True True ... True False False] ... [ True True True ... False False False] [ True True True ... False False False] [ True True True ... False False False]], shape=(64, 20), dtype=bool) |
可以看到,上面打印的第一个张量是矢量化输入句子的一个批次(64个样本),用零填充到长度20。每个标记是一个整数,但将被转换为维度为512的嵌入。因此,en_emb的形状为(64, 20, 512)。
上面打印的最后一个张量是使用的掩码。这基本上匹配输入中非零的位置。在计算准确率时,您必须记住填充的位置不应被计算。
在下一课中,您将完成Transformer模型的其他构建块。
第 06 课:Transformer 构建块
再次查看Lesson 05中的Transformer图,您会发现除了嵌入和位置编码之外,您还有编码器(图的左半部分)和解码器(图的右半部分)。它们有一些相似之处。最值得注意的是,它们在开始时都有一个多头注意力块,在末尾都有一个前馈块。
如果将每个构建块创建为单独的子模型,然后在以后将它们组合成一个更大的模型,那会更容易。
首先,您创建自注意力模型。它位于编码器和解码器底部的图的一部分。多头注意力层将接收三个输入,即键、值和查询。如果所有三个输入都相同,我们就称这种多头注意力层为自注意力。该子模型将包含一个add & norm层,并带有skip connection来规范化注意力层的输出。其实现如下:
|
1 2 3 4 5 6 7 8 9 10 11 12 13 14 15 16 17 18 19 20 21 22 23 24 25 26 27 28 29 30 31 32 33 34 35 |
import tensorflow as tf def self_attention(input_shape, prefix="att", mask=False, **kwargs): """Transformer编码器和解码器中的自注意力层。假设其 输入来自位置编码层。 参数 prefix (str): 添加到层名称的前缀 masked (bool): 是否使用因果掩码。在编码器上应为False,在 解码器上应为True。当为True时,将应用一个掩码,使得 每个位置只能访问其前面的位置。 """ # 创建层 inputs = tf.keras.layers.Input(shape=input_shape, dtype='float32', name=f"{prefix}_in1") attention = tf.keras.layers.MultiHeadAttention(name=f"{prefix}_attn1", **kwargs) norm = tf.keras.layers.LayerNormalization(name=f"{prefix}_norm1") add = tf.keras.layers.Add(name=f"{prefix}_add1") # 函数式 API 连接输入到输出 attout = attention(query=inputs, value=inputs, key=inputs, use_causal_mask=mask) outputs = norm(add([inputs, attout])) # 创建模型并返回 model = tf.keras.Model(inputs=inputs, outputs=outputs, name=f"{prefix}_att") 返回 model seq_length = 20 key_dim = 128 num_heads = 8 model = self_attention(input_shape=(seq_length, key_dim), num_heads=num_heads, key_dim=key_dim) tf.keras.utils.plot_model(model, "self-attention.png", show_shapes=True, show_dtype=True, show_layer_names=True, rankdir='BT', show_layer_activations=True) |
上面定义的函数对编码器和解码器都是通用的。解码器将设置mask=True选项来将因果掩码应用于输入。
设置一些参数并创建一个模型。绘制的模型将如下所示。
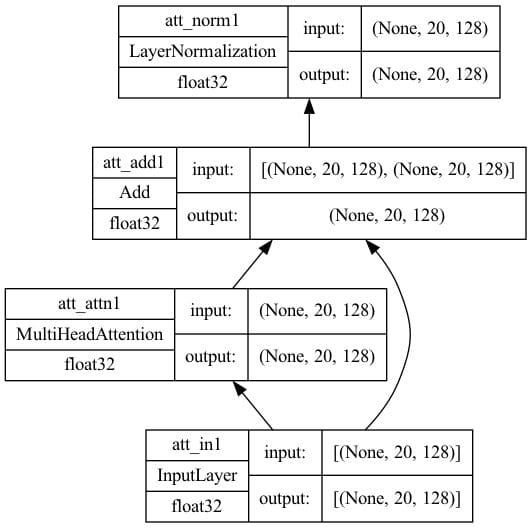
键维度=128的自注意力架构
在解码器中,您有一个交叉注意力模型,它接收来自自注意力模型以及编码器的输入。在这种情况下,值和键是来自编码器的输出,而查询是来自自注意力模型的输出。在高层次上,它基于编码器对源句子上下文的理解,并以解码器输入的(可能是空的)部分句子作为查询,来预测如何完成句子。这是与自注意力模型的唯一区别;因此,代码非常相似
|
1 2 3 4 5 6 7 8 9 10 11 12 13 14 15 16 17 18 19 20 21 22 23 24 25 26 27 28 29 30 31 32 33 34 35 36 |
import tensorflow as tf def cross_attention(input_shape, context_shape, prefix="att", **kwargs): """Transformer解码器中的交叉注意力层。假设其 输入是解码器中的位置编码层的输出 以及context是来自编码器的最终输出。 参数 prefix (str): 添加到层名称的前缀 """ # 创建层 context = tf.keras.layers.Input(shape=context_shape, dtype='float32', name=f"{prefix}_ctx2") inputs = tf.keras.layers.Input(shape=input_shape, dtype='float32', name=f"{prefix}_in2") attention = tf.keras.layers.MultiHeadAttention(name=f"{prefix}_attn2", **kwargs) norm = tf.keras.layers.LayerNormalization(name=f"{prefix}_norm2") add = tf.keras.layers.Add(name=f"{prefix}_add2") # 函数式 API 连接输入到输出 attout = attention(query=inputs, value=context, key=context) outputs = norm(add([attout, inputs])) # 创建模型并返回 model = tf.keras.Model(inputs=[(context, inputs)], outputs=outputs, name=f"{prefix}_cross") 返回 model seq_length = 20 key_dim = 128 num_heads = 8 model = cross_attention(input_shape=(seq_length, key_dim), context_shape=(seq_length, key_dim), num_heads=num_heads, key_dim=key_dim) tf.keras.utils.plot_model(model, "cross-attention.png", show_shapes=True, show_dtype=True, show_layer_names=True, rankdir='BT', show_layer_activations=True) |
绘制的模型将如下所示。请注意,此模型有两个输入,一个用于context,另一个用于来自自注意力的输入。

键维度=128的交叉注意力架构
最后,编码器和解码器都有前馈模型。它在Keras中实现为Dense层
|
1 2 3 4 5 6 7 8 9 10 11 12 13 14 15 16 17 18 19 20 21 22 23 24 25 26 27 28 29 30 31 32 33 34 35 36 37 38 39 |
import tensorflow as tf def feed_forward(input_shape, model_dim, ff_dim, dropout=0.1, prefix="ff"): """Transformer编码器和解码器中的前馈层。假设其 输入是来自注意力层和add & norm的输出,输出 是其中一个编码器或解码器块的输出 参数 model_dim (int): 前馈层的输出维度,它 也是编码器/解码器的输出维度 块 ff_dim (int): 前馈层的内部维度 dropout (float): Dropout率 prefix (str): 添加到层名称的前缀 """ # 创建层 inputs = tf.keras.layers.Input(shape=input_shape, dtype='float32', name=f"{prefix}_in3") dense1 = tf.keras.layers.Dense(ff_dim, name=f"{prefix}_ff1", activation="relu") dense2 = tf.keras.layers.Dense(model_dim, name=f"{prefix}_ff2") drop = tf.keras.layers.Dropout(dropout, name=f"{prefix}_drop") add = tf.keras.layers.Add(name=f"{prefix}_add3") # 函数式 API 连接输入到输出 ffout = drop(dense2(dense1(inputs))) norm = tf.keras.layers.LayerNormalization(name=f"{prefix}_norm3") outputs = norm(add([inputs, ffout])) # 创建模型并返回 model = tf.keras.Model(inputs=inputs, outputs=outputs, name=f"{prefix}_ff") 返回 model seq_length = 20 key_dim = 128 ff_dim = 512 model = feed_forward(input_shape=(seq_length, key_dim), model_dim=key_dim, ff_dim=ff_dim) tf.keras.utils.plot_model(model, "feedforward.png", show_shapes=True, show_dtype=True, show_layer_names=True, rankdir='BT', show_layer_activations=True) |
绘制的模型将如下所示。请注意,第一个Dense层使用ReLU激活,第二个没有激活。然后附加一个Dropout层用于正则化。
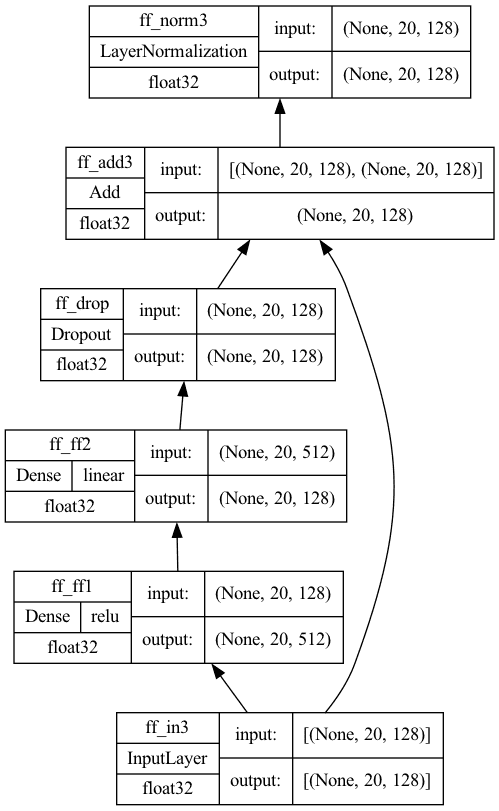
前馈子模型
您的任务
运行以上代码并验证您看到的模型图相同。匹配布局非常重要,因为最终的Transformer模型取决于它们。
在上面的代码中,使用了Keras函数式API。在Keras中,您可以使用顺序API、函数式API或子类化Model类来构建模型。也可以在这里使用子类化,但顺序API不能。您能解释一下原因吗?
在下一课中,您将利用这些构建块来创建编码器和解码器。
第 07 课:Transformer 编码器和解码器
再次查看Lesson 05中的Transformer图。您会发现编码器是连接到前馈子模型的自注意力子模型。另一方面,解码器是按顺序连接的自注意力子模型、交叉注意力子模型和前馈子模型。
因此,一旦有了这些构建块,创建编码器和解码器就不难了。首先,您有编码器。它足够简单,您可以使用Keras顺序API来构建一个编码器模型。
|
1 2 3 4 5 6 7 8 9 10 11 12 13 14 15 16 17 18 19 20 21 22 23 24 25 26 |
import tensorflow as tf # Lesson 06 中的构建块函数 from lesson_06 import self_attention, feed_forward def encoder(input_shape, key_dim, ff_dim, dropout=0.1, prefix="enc", **kwargs): """一个编码器单元。输入和输出形状相同,因此我们可以 将多个编码器单元串联成一个更大的编码器""" model = tf.keras.models.Sequential([ tf.keras.layers.Input(shape=input_shape, dtype='float32', name=f"{prefix}_in0"), self_attention(input_shape, prefix=prefix, key_dim=key_dim, mask=False, **kwargs), feed_forward(input_shape, key_dim, ff_dim, dropout, prefix), ], name=prefix) 返回 model seq_length = 20 key_dim = 128 ff_dim = 512 num_heads = 8 model = encoder(input_shape=(seq_length, key_dim), key_dim=key_dim, ff_dim=ff_dim, num_heads=num_heads) tf.keras.utils.plot_model(model, "encoder.png", show_shapes=True, show_dtype=True, show_layer_names=True, rankdir='BT', show_layer_activations=True) |
Plotting the model would see that it is simple as the following
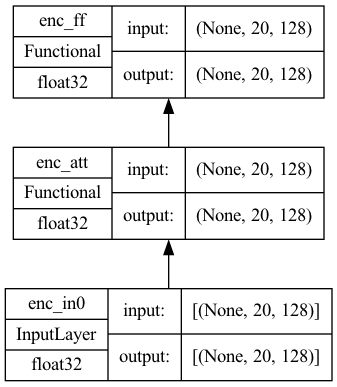
Encoder submodel
The decoder is a bit complicated because the cross-attention block takes input from the encoder as well; hence it is a model that takes two input. It is implemented as follows
|
1 2 3 4 5 6 7 8 9 10 11 12 13 14 15 16 17 18 19 20 21 22 23 24 25 26 27 28 29 30 31 32 33 34 35 |
import tensorflow as tf # the three building block functions from Lesson 06 from lesson_06 import self_attention, cross_attention, feed_forward def decoder(input_shape, key_dim, ff_dim, dropout=0.1, prefix="dec", **kwargs): "One decoder unit. The input and output are in the same shape so we can daisy chain multiple decoder units into one larger decoder. The context vector is also assumed to be the same shape for convenience""" inputs = tf.keras.layers.Input(shape=input_shape, dtype='float32', name=f"{prefix}_in0") context = tf.keras.layers.Input(shape=input_shape, dtype='float32', name=f"{prefix}_ctx0") attmodel = self_attention(input_shape, key_dim=key_dim, mask=True, prefix=prefix, **kwargs) crossmodel = cross_attention(input_shape, input_shape, key_dim=key_dim, prefix=prefix, **kwargs) ffmodel = feed_forward(input_shape, key_dim, ff_dim, dropout, prefix) x = attmodel(inputs) x = crossmodel([(context, x)]) output = ffmodel(x) model = tf.keras.Model(inputs=[(inputs, context)], outputs=output, name=prefix) 返回 model seq_length = 20 key_dim = 128 ff_dim = 512 num_heads = 8 model = decoder(input_shape=(seq_length, key_dim), key_dim=key_dim, ff_dim=ff_dim, num_heads=num_heads) tf.keras.utils.plot_model(model, "decoder.png", show_shapes=True, show_dtype=True, show_layer_names=True, rankdir='BT', show_layer_activations=True) |
The model will look like the following

Decoder submodel
您的任务
Copy over the three building block functions from Lesson 06 and run the above code to make sure you see the same layout as shown, in both the encoder and decoder.
In the next lesson, you will complete the transformer model with the building block you have created so far.
第 08 课:构建 Transformer
Indeed, a transformer has encoder and decoder parts, and each part is not one but a series of encoders or decoders. It sounds complicated but not if you have the building block submodels to hide the details.
Refer to the figure in Lesson 05, and you see the encoder and decoder parts are just a chain of encoder and decoder blocks. Only the output of the final encoder block is used as input to the decoder blocks.
Therefore, the complete transformer model can be built as follows
|
1 2 3 4 5 6 7 8 9 10 11 12 13 14 15 16 17 18 19 20 21 22 23 24 25 26 27 28 29 30 31 32 33 34 35 36 37 38 39 40 41 42 43 44 45 46 47 48 49 50 51 52 53 54 55 56 57 |
import tensorflow as tf # the positional embedding layer from Lesson 05 from lesson_05 import PositionalEmbedding # the building block functions from Lesson 07 from lesson_07 import encoder, decoder def transformer(num_layers, num_heads, seq_len, key_dim, ff_dim, vocab_size_src, vocab_size_tgt, dropout=0.1, name="transformer"): embed_shape = (seq_len, key_dim) # output shape of the positional embedding layer # set up layers input_enc = tf.keras.layers.Input(shape=(seq_len,), dtype="int32", name="encoder_inputs") input_dec = tf.keras.layers.Input(shape=(seq_len,), dtype="int32", name="decoder_inputs") embed_enc = PositionalEmbedding(seq_len, vocab_size_src, key_dim, name="embed_enc") embed_dec = PositionalEmbedding(seq_len, vocab_size_tgt, key_dim, name="embed_dec") encoders = [encoder(input_shape=embed_shape, key_dim=key_dim, ff_dim=ff_dim, dropout=dropout, prefix=f"enc{i}", num_heads=num_heads) for i in range(num_layers)] decoders = [decoder(input_shape=embed_shape, key_dim=key_dim, ff_dim=ff_dim, dropout=dropout, prefix=f"dec{i}", num_heads=num_heads) for i in range(num_layers)] final = tf.keras.layers.Dense(vocab_size_tgt, name="linear") # build output x1 = embed_enc(input_enc) x2 = embed_dec(input_dec) for layer in encoders: x1 = layer(x1) for layer in decoders: x2 = layer([x2, x1]) output = final(x2) # XXX keep this try-except block try: del output._keras_mask except AttributeError: pass model = tf.keras.Model(inputs=[input_enc, input_dec], outputs=output, name=name) 返回 model seq_len = 20 num_layers = 4 num_heads = 8 key_dim = 128 ff_dim = 512 dropout = 0.1 vocab_size_en = 10000 vocab_size_fr = 20000 model = transformer(num_layers, num_heads, seq_len, key_dim, ff_dim, vocab_size_en, vocab_size_fr, dropout) tf.keras.utils.plot_model(model, "transformer.png", show_shapes=True, show_dtype=True, show_layer_names=True, rankdir='BT', show_layer_activations=True) |
The try–except block in the code is to handle a bug in certain versions of TensorFlow that may cause the training error calculated erroneously. The model plotted above would be like the following. Not very simple, but the architecture is still tractable.
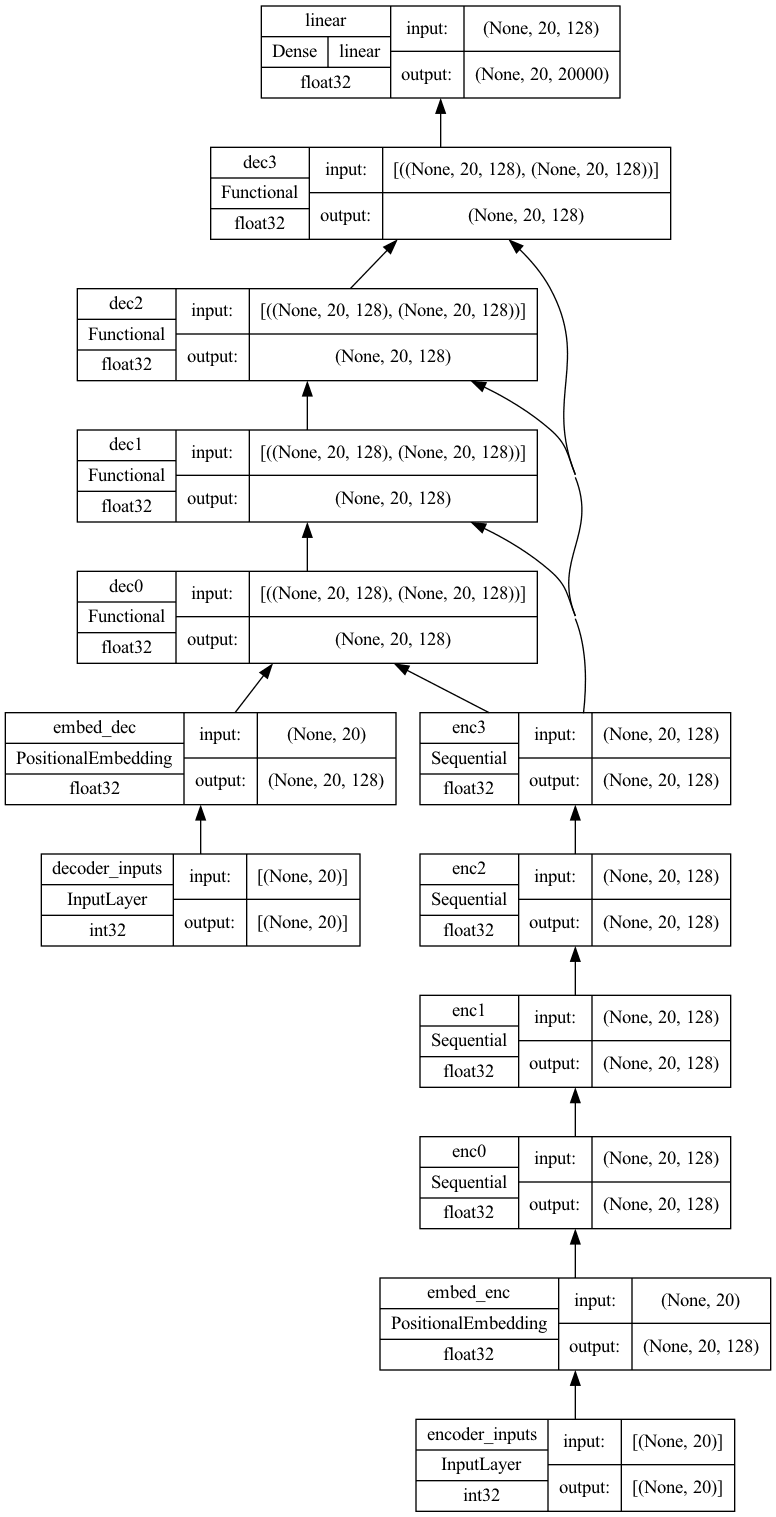
Transformer with 4 layers in encoder and 4 layers in decoder
您的任务
Copy over the three building block functions from Lessons 05, 06, and 07, so you can run the above code and generate the same diagram. You will reuse this model in the subsequent lessons.
In the next lesson, you will set up the other training parameters for this model.
Lesson 09: Prepare the Transformer Model for Training
Before you can train your transformer, you need to decide how you should train it.
According to the paper Attention Is All You Need, you are using Adam as the optimizer but with a custom learning rate schedule,
$$\text{LR} = \frac{1}{\sqrt{d_{\text{model}}}} \min\big(\frac{1}{\sqrt{n}}, \frac{n}{\sqrt{m^3}}\big)$$
It is implemented as follows
|
1 2 3 4 5 6 7 8 9 10 11 12 13 14 15 16 17 18 19 20 21 22 23 24 25 26 27 28 29 30 31 32 33 |
import matplotlib.pyplot as plt import tensorflow as tf class CustomSchedule(tf.keras.optimizers.schedules.LearningRateSchedule): "Custom learning rate for Adam optimizer" def __init__(self, key_dim, warmup_steps=4000): super().__init__() self.key_dim = key_dim self.warmup_steps = warmup_steps self.d = tf.cast(self.key_dim, tf.float32) def __call__(self, step): step = tf.cast(step, dtype=tf.float32) arg1 = tf.math.rsqrt(step) arg2 = step * (self.warmup_steps ** -1.5) return tf.math.rsqrt(self.d) * tf.math.minimum(arg1, arg2) def get_config(self): # to make save and load a model using custom layer possible0 config = { "key_dim": self.key_dim, "warmup_steps": self.warmup_steps, } return config key_dim = 128 lr = CustomSchedule(key_dim) optimizer = tf.keras.optimizers.Adam(lr, beta_1=0.9, beta_2=0.98, epsilon=1e-9) plt.plot(lr(tf.range(50000, dtype=tf.float32))) plt.ylabel('Learning Rate') plt.xlabel('Train Step') plt.show() |
The learning rate schedule is designed in such a way that it learns slowly at the beginning but accelerates as it learns. This helps because the model is totally random at the beginning, and you cannot even trust the output much. But as you train the model enough, the result should be sufficiently sensible and thus you can learn faster to help convergence. The learning rate as plotted would look like the following
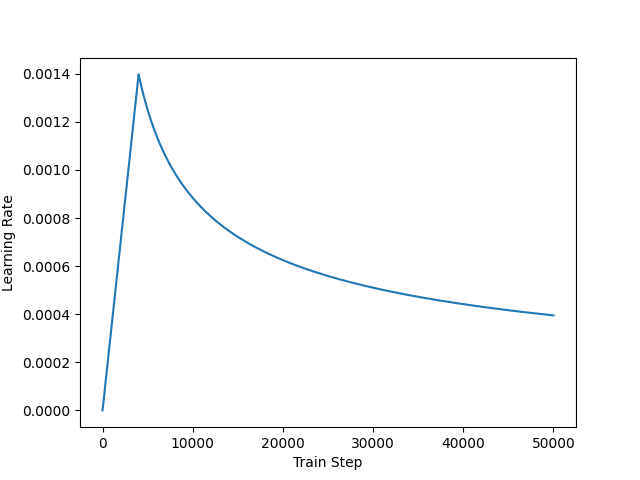
Customized learning rate schedule
Next, you also need to define the loss metric and accuracy metric for training. This model is special because you need to apply a mask to the output to calculate the loss and accuracy only on the non-padding elements. Borrow the implementation from TensorFlow’s tutorial Neural machine translation with a Transformer and Keras
|
1 2 3 4 5 6 7 8 9 10 11 12 13 14 15 16 17 18 19 20 21 22 23 24 25 |
def masked_loss(label, pred): mask = label != 0 loss_object = tf.keras.losses.SparseCategoricalCrossentropy( from_logits=True, reduction='none') loss = loss_object(label, pred) mask = tf.cast(mask, dtype=loss.dtype) loss *= mask loss = tf.reduce_sum(loss)/tf.reduce_sum(mask) return loss def masked_accuracy(label, pred): pred = tf.argmax(pred, axis=2) label = tf.cast(label, pred.dtype) match = label == pred mask = label != 0 match = match & mask match = tf.cast(match, dtype=tf.float32) mask = tf.cast(mask, dtype=tf.float32) return tf.reduce_sum(match)/tf.reduce_sum(mask) |
有了这些,您现在可以按以下方式**编译**您的 Keras 模型
|
1 2 3 4 5 6 7 8 9 10 11 12 13 14 |
vocab_size_en = 10000 vocab_size_fr = 20000 seq_len = 20 num_layers = 4 num_heads = 8 key_dim = 128 ff_dim = 512 dropout = 0.1 model = transformer(num_layers, num_heads, seq_len, key_dim, ff_dim, vocab_size_en, vocab_size_fr, dropout) lr = CustomSchedule(key_dim) optimizer = tf.keras.optimizers.Adam(lr, beta_1=0.9, beta_2=0.98, epsilon=1e-9) model.compile(loss=masked_loss, optimizer=optimizer, metrics=[masked_accuracy]) model.summary() |
您的任务
如果您正确实现了所有内容,您应该能够提供所有构建块函数以使上述代码运行。尝试将您到目前为止所做的一切保存在一个 Python 脚本或一个 Jupyter notebook 中,并运行一次以确保没有错误生成,没有异常被引发。
如果一切顺利运行,您应该会看到上面的 `summary()` 打印出以下内容
|
1 2 3 4 5 6 7 8 9 10 11 12 13 14 15 16 17 18 19 20 21 22 23 24 25 26 27 28 29 30 31 32 33 34 35 36 37 38 39 40 41 |
Model: "transformer" __________________________________________________________________________________________________ Layer (type) Output Shape Param # Connected to ================================================================================================== encoder_inputs (InputLayer) [(None, 20)] 0 [] embed_enc (PositionalEmbedding (None, 20, 128) 1280000 ['encoder_inputs[0][0]'] ) enc0 (Sequential) (None, 20, 128) 659712 ['embed_enc[0][0]'] enc1 (Sequential) (None, 20, 128) 659712 ['enc0[0][0]'] decoder_inputs (InputLayer) [(None, 20)] 0 [] enc2 (Sequential) (None, 20, 128) 659712 ['enc1[0][0]'] embed_dec (PositionalEmbedding (None, 20, 128) 2560000 ['decoder_inputs[0][0]'] ) enc3 (Sequential) (None, 20, 128) 659712 ['enc2[0][0]'] dec0 (Functional) (None, 20, 128) 1187456 ['embed_dec[0][0]', 'enc3[0][0]'] dec1 (Functional) (None, 20, 128) 1187456 ['dec0[0][0]', 'enc3[0][0]'] dec2 (Functional) (None, 20, 128) 1187456 ['dec1[0][0]', 'enc3[0][0]'] dec3 (Functional) (None, 20, 128) 1187456 ['dec2[0][0]', 'enc3[0][0]'] linear (Dense) (None, 20, 20000) 2580000 ['dec3[0][0]'] ================================================================================================== Total params: 13,808,672 Trainable params: 13,808,672 不可训练参数: 0 __________________________________________________________________________________________________ |
此外,当您查看 transformer 模型的图以及这里的实现时,您应该会注意到图显示输出层有一个 softmax 层,但我们省略了它。Softmax 确实是在本课程中添加的。您看到它在哪里了吗?
在下一课中,您将训练这个编译好的模型,其拥有 1400 万个参数,正如我们在上面的摘要中所看到的。
第 10 课:训练 Transformer
训练 transformer 取决于您在前几课中所做的一切。最重要的是,Lesson 03 的 vectorizer 和数据集必须保存,因为它们将在本课和接下来的课程中重新使用。
|
1 2 3 4 5 6 7 8 9 10 11 12 13 14 15 16 17 18 19 20 21 22 23 24 25 26 27 28 29 30 31 32 33 34 35 36 37 38 39 40 41 42 43 44 45 |
import matplotlib.pyplot as plt import tensorflow as tf # Lesson 03 的数据集对象 from lesson_03 import train_ds, val_ds # Lesson 08 的构建块函数 from lesson_08 import transformer # Lesson 09 的学习率调度、损失和准确率函数 from lesson_09 import CustomSchedule, masked_loss, masked_accuracy # 创建并训练模型 seq_len = 20 num_layers = 4 num_heads = 8 key_dim = 128 ff_dim = 512 dropout = 0.1 vocab_size_en = 10000 vocab_size_fr = 20000 model = transformer(num_layers, num_heads, seq_len, key_dim, ff_dim, vocab_size_en, vocab_size_fr, dropout) lr = CustomSchedule(key_dim) optimizer = tf.keras.optimizers.Adam(lr, beta_1=0.9, beta_2=0.98, epsilon=1e-9) model.compile(loss=masked_loss, optimizer=optimizer, metrics=[masked_accuracy]) epochs = 20 model = model.fit(train_ds, epochs=epochs, validation_data=val_ds) # 保存训练好的模型 model.save("eng-fra-transformer.h5") # 绘制损失和准确率历史 fig, axs = plt.subplots(2, figsize=(6, 8), sharex=True) fig.suptitle('Traininig history') x = list(range(1, epochs+1)) axs[0].plot(x, history.history["loss"], alpha=0.5, label="loss") axs[0].plot(x, history.history["val_loss"], alpha=0.5, label="val_loss") axs[0].set_ylabel("Loss") axs[0].legend(loc="upper right") axs[1].plot(x, history.history["masked_accuracy"], alpha=0.5, label="acc") axs[1].plot(x, history.history["val_masked_accuracy"], alpha=0.5, label="val_acc") axs[1].set_ylabel("Accuracy") axs[1].set_xlabel("epoch") axs[1].legend(loc="lower right") plt.show() |
就是这样!
运行此脚本将花费数小时,但一旦完成,您将拥有保存的模型并绘制损失和准确率。它应该看起来像这样
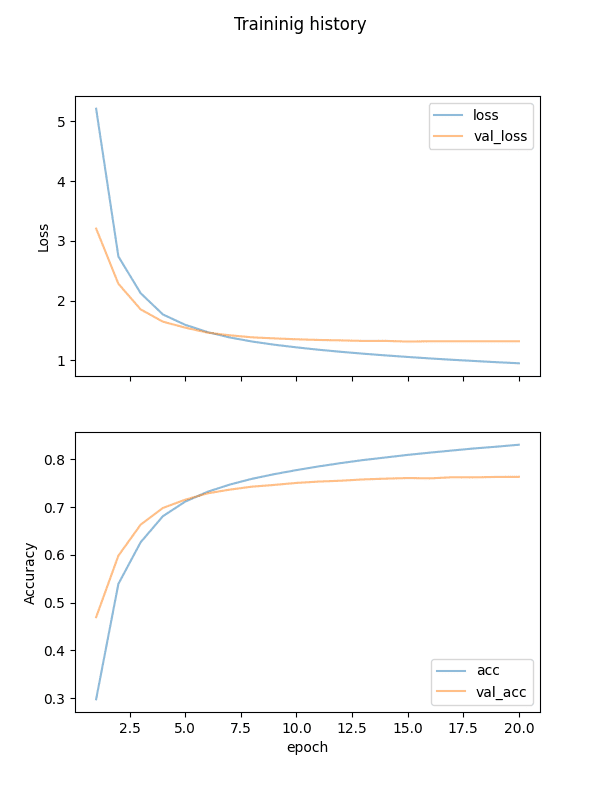
训练的损失和准确率历史
您的任务
在上面的训练设置中,我们没有使用 Keras 的提前停止和检查点回调。在运行它之前,请尝试修改上面的代码以添加这些回调。
提前停止回调可以在没有进展时帮助您中断训练。检查点回调可以帮助您保留得分最佳的模型,而不是只在最后一个 epoch 返回最后一个模型。
在下一课中,您将加载这个训练好的模型并进行测试。
第 11 课:Transformer 模型推理
在 Lesson 03 中,您将原始数据集按 70%-15%-15% 的比例分割为训练、验证和测试集。您在 Lesson 10 中使用了训练集和验证集来训练 transformer 模型。在本课中,您将使用测试集来查看您的训练模型的性能。
您在上节课中保存了 transformer 模型。由于模型中包含一些自定义的层和函数,因此您需要创建一个 **自定义对象作用域** 来加载保存的模型。
Transformer 模型可以为您提供一个 token 索引。您需要 vectorizer 来查找该索引代表的单词。为了保持一致性,您必须重用创建数据集时使用的相同的 vectorizer。
创建一个循环来扫描生成的 token。换句话说,不要使用模型生成整个翻译的句子,而是只考虑句子中下一个生成的单词,直到看到结束 sentinel。第一个生成的单词将是由起始 sentinel 生成的。这就是为什么您在 Lesson 02 中以这种方式处理目标句子。
代码如下
|
1 2 3 4 5 6 7 8 9 10 11 12 13 14 15 16 17 18 19 20 21 22 23 24 25 26 27 28 29 30 31 32 33 34 35 36 37 38 39 40 41 42 43 44 45 46 47 48 49 50 51 52 53 54 55 56 |
import pickle import random import numpy as np import tensorflow as tf # Lesson 03 的数据集对象 from lesson_03 import test_pairs, eng_vectorizer, fra_vectorizer # the positional embedding layer from Lesson 05 from lesson_05 import PositionalEmbedding # Lesson 09 的学习率调度、损失和准确率函数 from lesson_09 import CustomSchedule, masked_loss, masked_accuracy # 加载训练好的模型 custom_objects = {"PositionalEmbedding": PositionalEmbedding, "CustomSchedule": CustomSchedule, "masked_loss": masked_loss, "masked_accuracy": masked_accuracy} with tf.keras.utils.custom_object_scope(custom_objects): model = tf.keras.models.load_model("eng-fra-transformer.h5") # 使用的训练参数 seq_len = 20 vocab_size_en = 10000 vocab_size_fr = 20000 def translate(sentence): """创建翻译后的句子""" enc_tokens = eng_vectorizer([sentence]) lookup = list(fra_vectorizer.get_vocabulary()) start_sentinel, end_sentinel = "[start]", "[end]" output_sentence = [start_sentinel] # 逐词生成翻译后的句子 for i in range(seq_len): vector = fra_vectorizer([" ".join(output_sentence)]) assert vector.shape == (1, seq_len+1) dec_tokens = vector[:, :-1] assert dec_tokens.shape == (1, seq_len) pred = model([enc_tokens, dec_tokens]) assert pred.shape == (1, seq_len, vocab_size_fr) word = lookup[np.argmax(pred[0, i, :])] output_sentence.append(word) if word == end_sentinel: break return output_sentence test_count = 20 for n in range(test_count): english_sentence, french_sentence = random.choice(test_pairs) translated = translate(english_sentence) print(f"Test {n}:") print(f"{english_sentence}") print(f"== {french_sentence}") print(f"-> {' '.join(translated)}") print() |
您的任务
首先,尝试运行此代码并观察推理结果。下面是一些示例
|
1 2 3 4 5 6 7 8 9 10 11 12 13 14 15 16 17 18 19 |
Test 2 it rained for three days . == [start] il a plu pendant trois jours . [end] -> [start] il a plu pendant trois jours . [end] Test 3 two people say they heard a gunshot . == [start] deux personnes disent qu'elles ont entendu une détonation . [end] -> [start] deux personnes disent qu'ils ont entendu un coup de feu . [end] Test 4 i'm not dead yet . == [start] je ne suis pas encore mort . [end] -> [start] je ne suis pas encore mort . [end] Test 5 i want us to get back together . == [start] je veux que nous nous remettions ensemble . [end] -> [start] je veux que nous nous [UNK] ensemble . [end] |
每项测试的第二行是预期输出,第三行是 transformer 的输出。
token `[UNK]` 表示“未知”或词汇外,应该很少出现。比较输出,您应该看到结果相当准确。它不会是完美的。例如,英语中的 *they* 可以映射到法语中的 *ils* 或 *elles*,具体取决于性别,而 transformer 无法始终区分这一点。
您是逐字生成翻译后的句子,但实际上 transformer 是一次性输出整个句子。您应该尝试修改程序,在 for 循环中解码整个 transformer 输出 `pred`,看看当您在 `dec_tokens` 中提供更多前导词时,transformer 如何给您一个更好的句子。
在下一课中,您将回顾到目前为止所做的工作,看看是否可以进行任何改进。
第 12 课:改进模型
您做到了!
让我们回顾一下您所做的工作以及可以改进的地方。您构建了一个 transformer 模型,该模型接受一个完整的英语句子和一个部分的法语句子(直到第 k 个 token)来预测下一个(第 k+1 个)token。
在训练中,您观察到最佳准确率在 70% 到 80% 之间。如何改进它?这里有一些想法,但肯定不详尽
- 您为文本输入使用了简单的分词器。NLTK 等库可以提供更好的分词器。此外,您没有使用子词分词。对于英语来说问题不大,但对于法语来说则有问题。这就是为什么您的模型中的法语词汇量非常大(例如,*l’air*(空气)和*d’air*(空气的)将成为不同的 token)。
- 您使用 embedding 层训练了自己的词嵌入。有现成的预训练嵌入(如 GloVe),它们通常提供更高质量的嵌入。这可能有助于您的模型更好地理解 **上下文**。
- 您使用一些参数设计了 transformer。您为多头注意力使用了 8 个头,输出向量维度为 128,句子长度限制为 20 个 token,dropout 率为 0.1,等等。调整这些参数肯定会对 transformer 产生或多或少的影响。同样重要的是训练参数,如 epoch 数、学习率调度和损失函数。
您的任务
找出如何更改代码以适应上述更改。但如果我们对其进行测试,您知道哪种方法可以判断一个模型是否优于另一个模型吗?
请在下面的评论中发布您的答案。我很想看看您能想出什么。
这是最后一课。
结束!(看看你已经走了多远)
您做到了。干得好!
花点时间回顾一下您已经走了多远。
- 您学会了如何获取明文句子,对其进行处理,并将其向量化
- 您根据论文 Attention Is All You Need 分析了 transformer 模型的构建块,并使用 Keras 实现每个构建块
- 您将构建块连接成一个完整的 transformer 模型,并对其进行训练
- 最后,您可以亲眼看到训练好的模型以高准确率将英语句子翻译成法语
总结
您对这个迷你课程的学习情况如何?
您喜欢这个速成课程吗?
您有任何问题吗?有没有遇到什么难点?
告诉我。在下面留言。
学习 Transformer 和注意力!
教您的深度学习模型阅读句子
...使用带有注意力的 Transformer 模型
在我的新电子书中探索如何实现
使用注意力机制构建 Transformer 模型
它提供了自学教程和可运行代码,指导您构建一个可以
将句子从一种语言翻译成另一种语言的完整 Transformer 模型...


你好,Adrian
对于第一课,您设置了
vocab_size_en = 10000
vocab_size_fr = 20000
seq_length = 20
但 token 分析显示
Total english tokens: 14969
Total french tokens: 31271
Max English length: 51
Max french length: 58
这意味着您设置的词汇量大小远低于文本中的实际 token 计数,而 'seq_length=20' 比最大 token 长度 51 和 58 小得多。当句子 token 长度超过 20 时,哪些 token 会被丢弃?
这个理解正确吗?
正确。这是故意的,目的是丢弃不常用的词,并忽略更长但罕见的这种情况。这种权衡是为了让我们专注于常见用例并产生更好的翻译器。
你好 Adrian,
在我的电脑上运行模型很困难,有没有可能获得模型文件 “eng-fra-transformer.h5”?
提前感谢。
嗨 Furio…你试过 Google Colab 吗?甚至还有一个 GPU 选项可用。
嗨 Adrian!
一如既往的精彩!
也许你能帮我解决这个问题
在调用创建自注意力层的函数时,即
> model = self_attention(input_shape=(seq_length, key_dim),
> num_heads=num_heads, key_dim=key_dim)
我收到此错误消息
TypeError: call() got an unexpected keyword argument ‘use_causal_mask’
如果我从以下代码中删除 'use_causal_mask' 参数
> attout = attention(query=inputs, value=inputs, key=inputs, use_causal_mask=mask)
模型运行正常。
然而,据我所知,此参数必须设置为 True 才能用于解码器。
您知道我该如何解决这个问题吗?
我已经将 tensorflow 更新到最新版本,但没有帮助。
非常感谢!
嗨 Tom…您可能会发现以下资源很有趣
https://github.com/tensorflow/nmt/issues/471
嗨 James,我也遇到了同样的问题。我正在使用 tensorflow v2.14。我不明白从那个博客里该做什么。有什么建议可以修改本课程中的代码使其正常工作吗?谢谢
嗨 Ming…您遇到哪些具体的错误消息?这样我们才能更好地指导您。
我在 Tensorflow/keras 2.9 中遇到了同样的问题,其中“use_causal_mask”不受支持。该参数是在 2.10 版本之后添加的。如果我无法更新我的 Tensorflow 版本,有什么简单的方法可以解决这个问题吗?我可以删除此参数而不更改代码中的任何其他内容,代码运行正常。但是,课程的最后一部分没有生成预期的法语输出。相反,它每次在测试数据中运行时总是生成一个不正确的字符串。例如
do as i tell you .
== [start]fais comme je te dis .[end]
-> [start] 40 40 programmeur programmeur programmeur prendrais programmeur programmeur patiner patiner patiner c’était erreur .[end] ? ? ? ? ? ?
Test 1
i suggested that we go fishing .
== [start]j’ai proposé que nous allions pêcher .[end]
-> [start] 40 40 programmeur programmeur programmeur prendrais programmeur programmeur patiner patiner patiner c’était erreur .[end] ? ? ? ? ? ?
我怀疑这是因为删除了“use_causal_mask”参数。@Adrian,有没有简单的方法可以在 Tensorflow 2.9 中修复这个问题?
我认为这有点困难,虽然并非不可能。因果掩码在此处很重要,因为推理的运行方式。我们会给您一个完整的英语句子和一个部分的法语句子(至少是开始 sentinel),模型应该预测法语句子的下一个单词。因果掩码是为了在训练期间隐藏要预测的句子的后半部分。
如果您不能使用 TensorFlow 2.10,唯一的办法是避免使用 `fit()` 函数提供的默认训练循环,而是使用 Gradient Tape 编写自己的训练循环。这需要编写更多的代码。
当我在 Lesson 5 中运行以下任务时,会报错
# 来自 Lesson 03
# train_ds = make_dataset(train_pairs)
vocab_size_en = 10000
seq_length = 20
# 测试数据集
for inputs, targets in train_ds.take(1)
print(inputs[“encoder_inputs”])
embed_en = PositionalEmbedding(seq_length, vocab_size_en, embed_dim=512)
en_emb = embed_en(inputs[“encoder_inputs”])
print(en_emb.shape)
print(en_emb._keras_mask)
错误消息是
—————————————————————————
InvalidArgumentError 回溯(最近一次调用在最后)
~\AppData\Local\Temp\ipykernel_41016\2379217237.py in
9 print(inputs[“encoder_inputs”])
10 embed_en = PositionalEmbedding(seq_length, vocab_size_en, embed_dim=512)
—> 11 en_emb = embed_en(inputs[“encoder_inputs”])
12 print(en_emb.shape)
13 print(en_emb._keras_mask)
~\.conda\envs\Tensorflow2\lib\site-packages\keras\utils\traceback_utils.py 在 error_handler(*args, **kwargs) 中
65 except Exception as e: # pylint: disable=broad-except
66 filtered_tb = _process_traceback_frames(e.__traceback__)
—> 67 raise e.with_traceback(filtered_tb) from None
68 finally
69 del filtered_tb
~\AppData\Local\Temp\ipykernel_41016\1506590554.py 在 call(self, inputs) 中
51 with position vectors”””
52 embedded_tokens = self.token_embeddings(inputs)
—> 53 return embedded_tokens + self.position_embeddings
54
55 # this layer is using an Embedding layer, which can take a mask
InvalidArgumentError: 在调用 layer “positional_embedding” (type PositionalEmbedding) 时遇到异常。
Expected ‘tf.Tensor(False, shape=(), dtype=bool)’ to be true. Summarized data: b’Unable to broadcast: dimension size mismatch in dimension’
请帮忙。
Hi N Prinja…Did you type the code in or copy and paste it? Also, please try it in Google Colab to rule out any issues with your local Python environment.
Please see if your
inputs["encoder_inputs"]and thePositionalEmbedding()match in the dimension. It seems to be the error is about this.Hello Adrian Tam,
Good job. Excellent idea… You and your team need to keep this going…. I know this takes a lot of time, so what do you think about the idea of launching a friendly priced membership/subscription for new projects, where the mentoring for the current project would be recorded where those joining later could use them????? I believe that today there are several problems to be solved and maybe even the contribution of subscribers with masses of data would help in current projects. It would be something like kaggle, but more interactive with a focus on knowledge dissemination.
good job,
谢谢。
Thank you Fabio for your feedback, support and suggestions!
To confirm, would this code and model be appropriate for training a “custom language” model? In other words, i’d like to train my own “language.” For context, the “language” will be a propriety encoding of numeric data into English alpha characters. My current models predict the overall average data well, but struggle with the random outliers that occur less often. I’m interested in accurate prediction of the outliers.
谢谢!
And I just want to add, I’ve purchased a past version of your library, maybe 5 years ago, it was and is a fantastic resource. Thanks again!
Appropriate as it should be. But don’t expect to fit all outliers. In fact, no machine learning model can be perfect and it is a hard problem on how to draw the line on which outlier can we tolerate. Besides, it is not a very big model but it does it job on many language pairs (you can try English vs Italian on the same code, for example). If you custom language is not very sophisticated, it may work too.
Thank you for the reply! I’ve made it through the tutorial and am getting responses. Feeling excited and relieved…whew!
Question please: Is there a blog post or resource that would show me how to save this model to something I could include with an application on other machines? The two I’m thinking of are h5 and converting to onnx, but I’d like to see what you all say. Or is this the “final” format/structure of the model.
再次感谢!
See if these helps
– https://machinelearning.org.cn/web-frameworks-for-your-python-projects/
– https://machinelearning.org.cn/save-load-keras-deep-learning-models/
你好,
I can’t see where the softmax is used. Can you explain ?
Thanks for the turorial.
Hi Mohammed…The following resource may provide some insight on its usage
https://machinelearning.org.cn/softmax-activation-function-with-python/
Hi there! Thanks for the crash course!
I have used your crash course as a reference to build a transformer for machine translation of English texts into Bengali. There aren’t any errors but my model keeps on overfitting, with increasing validation loss and very low validation accuracy. I tried increasing the dropout value to 0.5, reducing the batch size to 32, and increasing the dataset size but to no avail.
I was wondering whether you could provide some insights on this?
Hi Andre…The following resource may be of interest
https://medium.datadriveninvestor.com/challenging-and-improving-nlp-model-in-proper-manner-ec2ed2d7629d
Hidden softmax -> logits=True . But when you to apply beam search in inference you need softmax on output.
Thank you for your reply orhan!
Dear orhan, could you please provide more information about how could i apply beam search to the output of the model instead of using greedy method?
where exactly you see i could change in the code to get more than one possible translation in order to get the most probable ones?
i replaced the argmax with argsort and filtering on the highest probable outputs
pred = model([enc_tokens, dec_tokens])
pred = np.argsort(pred)[::-1]
but i want more sophisticated solution to apply the beam search here.
any thoughts or hints?
提前感谢。
或者
pred = model([enc_tokens, dec_tokens])
pred = tf.nn.softmax(pred, 2)
嗨 James,
I have a question that i think is very important for machine translation. How can i get alignment information between source and target?
I’ve used this reference and building a Transformer to predict output sequence which is of fixed length. However my input is of length 10 and output is of length 4. I did try changing the transformer by passing different lengths for input and output but I’m getting the warning saying
“WARNING:tensorflow:Model was constructed with shape (None, 4, 128) for input KerasTensor(type_spec=TensorSpec(shape=(None, 4, 128), dtype=tf.float32, name=’dec0_ctx0′), name=’dec0_ctx0′, description=”created by layer ‘dec0_ctx0′”), but it was called on an input with incompatible shape (None, 10, 128) ”
But the model is able to train, so I’m not sure what I’m doing is right or wrong?
Hi Heverson…An error has not occurred. It is a warning so it is likely there is no major issue.
The following may be of interest
https://stackoverflow.com/questions/61656444/warning-warningtensorflowmodel-was-constructed-with-shape-none-150-but-i
嘿,詹姆斯,
I successfully executed the code snippets but somehow I’m unable to get the desired accuracy and also the transformer output is blank as copied below. Could you advise the possibility of this issue?
Test 19
i believe he is coming tomorrow .
== [start] je crois qu’il vient demain . [end]
-> [start] . . . . . [end]
Hi Farhat…What environment did you execute your code? You may wish to try Google Colab.
嗨 James,
Please can you answer? How can i get alignment information between source and target?
Hi Professor Jason,
I would like to first thank you for this wonderful lesson.
While reading this tutorial, I noticed that padding_mask is only used when we are calculating loss and accuracy (if I’m not mistaken). So my question here
Why didn’t we use it in the encoder to prevent the padding from affecting the attention scores, is it a technical reason or just to simplify the model for the reader?
谢谢你
Hi Ali…You are very welcome! Your understanding is correct! In general the padding_mask would be used.
The following discussion provides some additional insight
https://stats.stackexchange.com/questions/422890/why-do-we-use-masking-for-padding-in-the-transformers-encoder
Thanks, I love your articles and hope you continue!
再次问好,
I’ve a new question; Isn’t it better to apply
tf.minimum(padding_mask, causal_mask)insted ofcausal_maskinattenation_1?class TransformerDecoder(layers.Layer):
def __init__(self, embed_dim, latent_dim, num_heads, **kwargs):
super().__init__(**kwargs)
self.embed_dim = embed_dim
self.latent_dim = latent_dim
self.num_heads = num_heads
self.attention_1 = layers.MultiHeadAttention(
num_heads=num_heads, key_dim=embed_dim
)
self.attention_2 = layers.MultiHeadAttention(
num_heads=num_heads, key_dim=embed_dim
)
self.dense_proj = keras.Sequential(
[layers.Dense(latent_dim, activation="relu"), layers.Dense(embed_dim),]
)
self.layernorm_1 = layers.LayerNormalization()
self.layernorm_2 = layers.LayerNormalization()
self.layernorm_3 = layers.LayerNormalization()
self.supports_masking = True
def call(self, inputs, encoder_outputs, mask=None)
causal_mask = self.get_causal_attention_mask(inputs)
if mask is not None
padding_mask = tf.cast(mask[:, tf.newaxis, :], dtype="int32")
padding_mask = tf.minimum(padding_mask, causal_mask)
attention_output_1 = self.attention_1(
query=inputs, value=inputs, key=inputs, attention_mask=causal_mask

        )
out_1 = self.layernorm_1(inputs + attention_output_1)
attention_output_2 = self.attention_2(
query=out_1,
value=encoder_outputs,
key=encoder_outputs,
attention_mask=padding_mask,

        )
out_2 = self.layernorm_2(out_1 + attention_output_2)
 proj_output = self.dense_proj(out_2)
 return self.layernorm_3(out_2 + proj_output)
谢谢!
I get it..
谢谢!
which model is best for create a chatbot?
Hello, thank you for a great transformer example! I have a question: How to produce the confidence of the prediction returned by the transformer model? On the example of translation: is it possible to have per word confidence of the returned text? How to approach this?
Thank you in advance for response!
please sir, i made some changes on the code to be able to translate from arabic language to english language.
i replaced every english_label variable with arabic_variable_label and every french_label variable with english_variable_label
also i have followed the same preprocessing and saved the new arabic-t-english data in text-pair.pickle file and used that file in the code.
i also changed the vocab size after study the data
#Total Arabic tokens: 261806
#Total English tokens: 389653
#Max Arabic length: 2
#Max English length: 11
#262142 total pairs
to be with values
# 根据输入数据分析确定的参数
vocab_size_ara = 100000
vocab_size_eng = 200000
seq_length = 10
the code worked fine on colab, but google colab take so long time to train and always the session clses before the train finished.
so i tried to run the code on remote server, i got that error while running
2023-08-24 09:36:16.841001: W tensorflow/core/kernels/data/cache_dataset_ops.cc:768] The calling iterator did not fully read the dataset being cached. In order to avoid unexpected truncation of the dataset, the partially cached contents of the dataset will be discarded. This can happen if you have an input pipeline similar to
dataset.cache().take(k).repeat(). You should usedataset.take(k).cache().repeat()instead.回溯(最近一次调用)
File “/app/app.py”, line 363, in
en_emb = embed_en(inputs[“encoder_inputs”])
File “/opt/conda/envs/opence-cuda/lib/python3.9/site-packages/keras/utils/traceback_utils.py”, line 67, in error_handler
raise e.with_traceback(filtered_tb) from None
File “/app/app.py”, line 336, in call
return embedded_tokens + self.position_embeddings
tensorflow.python.framework.errors_impl.InvalidArgumentError: 在调用 layer “positional_embedding” (type PositionalEmbedding) 时遇到异常。
Expected ‘tf.Tensor(False, shape=(), dtype=bool)’ to be true. Summarized data: b’Unable to broadcast: dimension size mismatch in dimension’
1
b’lengths=’
10
b’dim_size=’
1, 1, 1, 1, 1, 1, 1, 1, 1, 1, …
Call arguments received
• inputs=
(opence-cuda) [root@8a4be40a32a6 app]# python app.py -f –tail all
that error produced when i runned that block of code
# 根据输入数据分析确定的参数
vocab_size_ara = 100000
seq_length = 10
# 测试数据集
for inputs, targets in train_ds.take(1)
#print(inputs[“encoder_inputs”])
embed_en = PositionalEmbedding(seq_length, vocab_size_ara, embed_dim=512)
en_emb = embed_en(inputs[“encoder_inputs”])
#print(en_emb.shape)
#print(en_emb._keras_mask)
it is strange that it wrked fine on google colab, and taking it copy paste on the server and run it.
do you know why that error produces?
can i use that code for transliteration task that does not depend on the meaning of words , it just phonetics capturing?
what iam thinking of is to work on the character li=evel instead of working with a word level.
你怎么看?
Hi ReemOsama…Please clarify your question so that we may better assist you. The following resource may be of interest
https://machinelearning.org.cn/transformer-models-with-attention/
do the targets advanced by one token because of the start sentinel?
Hi uxdiin…Yes! Your understanding is correct! Let us know if we can help answer any additional questions regarding the tutorial.
is that possible to get more than on translation for the same input arranged from the highest probable translation to the least probable one ?
is that possible to get more than on translation for the same input arranged from the highest probable translation to the least probable one ?
is that possible to get more than one translation for the same input arranged from the highest probable translation to the least probable one ?
Hi ReemOsama…This is a great question! Perhaps considering the opposite problem will provide some insight into your query
https://stackoverflow.com/questions/72465086/transformers-model-keep-giving-the-same-translation-result
Hi! I followed the tutorial and got the correct output at each step. The final training epoch gave validation accuracy similar to the examples, and graphs look almost identical. For example
Epoch 20/20
1828/1828 [==============================] – 110s 60ms/step – loss: 0.9417 – masked_accuracy: 0.8322 – val_loss: 1.3322 – val_masked_accuracy: 0.7618
But when I run the inference in lesson 11 the translations appear to be completely random and nonsensical. What could cause this behavior? Any help greatly appreciated.
Some examples
Test 0
she can speak french fluently .
== [start] elle sait couramment parler le français . [end]
-> [start] toujours là , je sais impressionnée . [end]
Test 1
they’re too fat .
== [start] ils sont trop gros . [end]
-> [start] pas beaucoup de l’histoire . [end]
Test 2
i’ve never ridden a horse .
== [start] je ne suis jamais monté sur un cheval . [end]
-> [start] j’ai se avec appareil . [end]
Thank you for your feedback Ludwig! Let us know if we can help answer any questions.
I also have a similar prob, with nearly 80% val accuracy, the predictions are completely random event on train set. Can anyone explain this?
i want to believe that everything’s all right .
Test 0
i want to believe that everything’s all right .
== [start] je veux croire que tout va bien . [end]
-> [start] monde monde monde monde monde monde monde monde monde monde monde monde monde monde monde monde monde monde monde monde
hi , I want to predict time series using transformers and then compare it with other neural networks. Is this course suitable for me to learn Transformers?
Hi ammireza…Absolutely! Additionally, the following resource is a great starting point
https://machinelearning.org.cn/transformer-models-with-attention/
Thanks for the reply sir, i saw the question and the answers in the link but it does not provide any discussion for how to make the model get more than one outcome.
is there any other resources you can recommend about that point?
Good Afternoon,
I have faced issue when i run the command under Lesson 03: Vectorization and Making Datasets parts
Command
def make_dataset(pairs, batch_size=64)
“””Create TensorFlow Dataset for the sentence pairs”””
# aggregate sentences using zip(*pairs)
eng_texts, fra_texts = zip(*pairs)
结果
eng_texts, fra_texts = zip(*pairs)
ValueError: 要解包的值太多 (预期为2)
Please help me on this regards.
谢谢你。
Hi Yatabena…Did you copy and paste the code or type it in? Also, have you tried your code in Google Colab?
嗨 James,
thank you for the quick response.
I have copied the code to my environment but it gave me the above error,
I have also customized with my input languages but it shows same error. I haven’t tried on google Colab.
I can share you my entire code if needed.
FYI, on the reference project “English-to-Spanish translation with a sequence-to-sequence Transformer”, the developer didn’t save the vectorization.
ex. ### save for subsequent steps
with open(“vectorize.pickle”, “wb”) as fp
你好 James,
I think i have got the error. It was due to missing punctuation(:) on the below part. I have done like this.
random.shuffle(text_pairs)
n_val = int(0.15*len(text_pairs))
n_train = len(text_pairs) – 2*n_val
train_pairs = text_pairs[n_train]
val_pairs = text_pairs[n_train:n_train+n_val]
test_pairs = text_pairs[n_train+n_val]
Different from the posted code.
Thank you for everything you have done related to NLP.
嗨 James,
I am following the whole procedure and working fine. I am working on English and amharic languages which uses UTF-8. When i try to customize “Lesson 03: Vectorization and Making Datasets parts”, when i try to save vectorize.pickle it says with with open(“vectorize.pickle”, “wb”) as fp: code it shows an error. The error is as below
“amharicvec_weights”: amharic_vectorizer.get_weights()
return bytes_or_text.decode(encoding)
UnicodeDecodeError: ‘utf-8′ codec can’t decode bytes in position 2-3: unexpected end of data”
For your information i can normalize,split, save and retrieve text pairs
“with open(text_file,encoding=’utf8′,errors=’ignore’) as fp
text_pairs = [normalize(line) for line in fp]
# 打印一些样本
for _ in range(20)
print(random.choice(text_pairs))”
Please help me on this regards.
谢谢你。
嗨 James,
please help me on uni-code characters vectorizer like Chinese language on below code.
“sourcelanguagevec_weights”: sourcelanguage_vectorizer.get_weights(), it gave me the below error messages
———
return bytes_or_text.decode(encoding)
UnicodeDecodeError: ‘utf-8′ codec can’t decode bytes in position: unexpected end of data”
————–
Hi Mr. X…The following resource is a great starting point
https://intapi.sciendo.com/pdf/10.2478/jazcas-2022-0023
Hi, James,
When I ran Lesson 7, I got the following error message
—> 5 from lesson_06 import self_attention, feed_forward
ModuleNotFoundError: No module named ‘lesson_06’
I had successfully ran through to Lesson 6 with Colab, but their packages did not get seem saved.
请帮忙。
谢谢,
Kam
Hi Kam…The following resource will help with saving models.
https://machinelearning.org.cn/save-load-keras-deep-learning-models/
Hi, James,
When I ran Lesson 7, I got the following error message
—> 5 from lesson_06 import self_attention, feed_forward
ModuleNotFoundError: No module named ‘lesson_06’
I had sucessfully ran through to Lesson 6 with Colab, but their packages did not get seem saved.
请帮忙。
谢谢,
Kam
Great tutorial, thank you. The question is: is it possible to create a simple interface in streamlit or gradio using the model .h5 file we got after training and test the model there inputting our own sentences? please give some hint on this
Hi Sara…You are very welcome! Absolutely! You can find out more about more here
https://www.analyticsvidhya.com/blog/2023/02/streamlit-vs-gradio-a-guide-to-building-dashboards-in-python/
thank you for tutorial, It would be very helpful if you give any hint to use ready model .h5 file to use it further and test with our own input, lets say in gradio interface. is it possible?
hi james,
i got a error in the following code: history = model.fit(train_ds, epochs=epochs, validation_data=val_ds),
the error message is: cannot mix tensors and non-tensors
I dont know why it gives this error, so i am ask if you know how to solve this error.
您好 Vini……您在使用
model.fit时看到的“无法混合张量和非张量”错误消息,通常表示在训练和验证期间传递给模型的数据类型存在不匹配。如果其中一个数据集(train_ds或val_ds)是 TensorFlowDataset对象,而另一个未正确格式化为该对象,则可能发生这种情况。以下是您可以执行的几个步骤和检查,以进行故障排除并有望解决此问题
1. **检查数据类型**:确保
train_ds和val_ds都是tf.data.Dataset的实例。您可以通过打印它们的类型来检查它们python
print(type(train_ds))
print(type(val_ds))
两者都应输出
2. **数据格式一致性**:确保两个数据集中的数据结构和格式一致。两个数据集都应以相同的格式生成批次,通常是
(inputs, labels)的元组。3. **数据管道检查**:查看用于创建
train_ds和val_ds的步骤。如果您正在应用转换(例如批处理、洗牌、用于预处理的映射函数),请确保这些转换以类似的方式应用于两个数据集。批处理或预处理数据集方式的差异可能导致训练期间出现错误。4. **直接定义数据集**:如果您不确定数据集的一致性或创建方式,您可能希望重新定义它们或创建一个小型虚拟数据集,以确保一切按预期工作。以下是使用合成数据的示例
pythonimport tensorflow as tf
import numpy as np
# 创建一个简单的数据集
def make_dataset(data_size, batch_size)
# 生成合成数据
x = np.random.random((data_size, 224, 224, 3)) # 示例图像输入
y = np.random.randint(2, size=(data_size, 1)) # 示例二元标签
dataset = tf.data.Dataset.from_tensor_slices((x, y))
dataset = dataset.batch(batch_size).prefetch(tf.data.AUTOTUNE)
return dataset
# 定义数据集
train_ds = make_dataset(1000, 32)
val_ds = make_dataset(200, 32)
# 定义一个简单的模型
model = tf.keras.models.Sequential([
tf.keras.layers.Conv2D(32, (3, 3), activation='relu', input_shape=(224, 224, 3)),
tf.keras.layers.MaxPooling2D((2, 2)),
tf.keras.layers.Flatten(),
tf.keras.layers.Dense(1, activation='sigmoid')

   ])
model.compile(optimizer='adam', loss='binary_crossentropy', metrics=['accuracy'])
 # 拟合模型
 history = model.fit(train_ds, epochs=10, validation_data=val_ds)
5. **模型定义中的错误**:仔细检查模型的输入和输出规范,确保它们与数据集中提供的数据一致。
通过遵循这些步骤,您应该能够找出问题的根源。如果问题仍然存在,请考虑提供有关
train_ds和val_ds如何定义的更多详细信息,因为数据准备或模型配置步骤中可能存在特定问题。我如何进行批量推断?如果我有不同的批次需要翻译,我该如何实现?
这可能是在本课程开始时的琐碎问题
当我使用输入数据集 eng-fra.zip 在 Google Colab 和 Jupyter Notebook(在 Anaconda 上)中复制相同的代码时。
我收到一个关于制表符分隔符问题的错误:“(尽管我在记事本中打开 txt 文件时在视觉上看不到任何分隔符问题)”
错误消息“ValueError: not enough values to unpack (expected 2, got 1)”源自行 eng, fra = line.split(“\t”)。这表明 split 方法返回的值只有一个,而不是预期的两个。这很可能是因为文件中的某些行不包含用于分隔的制表符 (\t)。
对此有什么建议吗?
您好 Shirina……您是复制粘贴的代码还是自己输入的?
在继续我先前的消息时,我想补充一点,制表符分隔符对于所有没有正则表达式标准化的行都能识别,但在标准化之后则不行。我认为输入文件中的制表符已被干扰。
我按照此教程的说明训练并保存了模型……但在加载模型和进行预测时遇到了问题……使用自定义对象
with tf.keras.utils.custom_object_scope(custom_objects)
—> model = tf.keras.models.load_model(“eng-fra-transformer.h5”)
TypeError: Missing required positional argument
请解释一下……我尝试了 Gemini 在 Colab 中建议的所有可能的更改,但它不起作用