
创建由 Qwen 驱动的轻量级个人助理
图片来源:编辑 | Midjourney
引言
Qwen 系列语言模型 为各种自然语言处理任务提供了强大且开源的大型语言模型。
本文将向您展示如何使用 Qwen 模型——特别是 Qwen1.5-7B-Chat 模型——来设置和运行一个 Python 驱动的个人助理应用程序。Qwen1.5-7B-Chat 是一个高效且相对轻量级的 70 亿参数聊天模型,针对对话用例进行了优化。代码已准备好在 Google Colab 等 Python Notebook 中使用,但如果需要,也可以轻松地适配在本地运行。
编码解决方案
由于构建 Qwen 驱动的助理需要安装多个依赖项和库,我们将首先安装它们并验证安装版本,以尽可能确保版本之间兼容。
|
1 |
pip install -q transformers accelerate bitsandbytes einops ipywidgets |
我们还设置了 GPU 使用(如果可用),以确保更快的模型推理,这是它在执行期间首次被调用时的情况。
初始设置步骤如下方代码所示
|
1 2 3 4 5 6 7 8 9 10 11 12 13 14 15 16 17 18 19 20 21 22 23 |
import torch from transformers import AutoModelForCausalLM, AutoTokenizer import time from IPython.display import display, HTML, clear_output import ipywidgets as widgets import sys import os # 验证已安装的包和依赖项 try: import bitsandbytes as bnb print("成功导入 bitsandbytes") except ImportError: print("导入 bitsandbytes 时出错。正在尝试重新安装...") !pip install -q bitsandbytes --upgrade import bitsandbytes as bnb # 安装必需的软件包(如果您已安装这些,则可能需要注释掉下面的单元格) !pip install -q transformers accelerate bitsandbytes einops # 设置设备,优先使用 GPU(如果可用) device = "cuda" if torch.cuda.is_available() else "cpu" print(f"正在使用设备: {device}") |
现在是时候加载和配置模型了
- 我们使用
Qwen/Qwen1.5-7B-Chat,它允许比 Qwen2.5-Omni 等更重的模型更快地进行首次推理,后者虽然功能强大,但不如该系列的其他版本轻量。 - 和往常一样,在加载预训练语言模型时,我们需要一个分词器,它能将文本输入转换为模型可读的格式。幸运的是,HuggingFace 的 Transformers 库中的
AutoTokenizer使这个过程更加顺畅。 - 为了提高效率,我们尝试配置 4 位量化,以优化内存使用。
123456789101112131415161718192021222324252627282930313233343536373839404142
# 加载 Qwen1.5-7B-Chat 模型 - 在 Google Colab 的 T4 GPU 上公开可用且运行高效model_name = "Qwen/Qwen1.5-7B-Chat" print(f"正在加载 {model_name}...")start_time = time.time() # 加载分词器tokenizer = AutoTokenizer.from_pretrained(model_name, trust_remote_code=True) # 尝试使用 4 位量化加载模型以提高效率try: print("正在尝试使用 4 位量化加载模型...") model = AutoModelForCausalLM.from_pretrained( model_name, torch_dtype=torch.bfloat16, # 使用 bfloat16 以提高性能 device_map="auto", trust_remote_code=True, quantization_config={"load_in_4bit": True} # 4 位量化以节省内存 )except Exception as e: print(f"4 位量化失败,错误为:{str(e)}") print("正在回退到 8 位量化...") try: model = AutoModelForCausalLM.from_pretrained( model_name, torch_dtype=torch.bfloat16, device_map="auto", trust_remote_code=True, load_in_8bit=True # 尝试 8 位量化 ) except Exception as e2: print(f"8 位量化失败,错误为:{str(e2)}") print("正在回退到标准加载(将使用更多内存)...") model = AutoModelForCausalLM.from_pretrained( model_name, torch_dtype=torch.bfloat16, device_map="auto", trust_remote_code=True ) load_time = time.time() - start_timeprint(f"模型加载耗时 {load_time:.2f} 秒")
在构建我们自己的对话式助手时,通常的做法是准备一个默认提示,它会伴随每个特定的请求,以根据我们的需求调整模型的行为和生成的响应。这里有一个特定的默认提示:
system_prompt = """你是一个乐于助人、尊重和诚实的助手。总是尽可能提供帮助,同时保持安全。你的回答应该引人入胜且有趣。
如果一个问题毫无意义,或者在事实层面不连贯,请解释原因,而不是回答不正确的内容。如果你不知道问题的答案,请不要分享虚假信息。"""
我们将定义的以下函数封装了执行流程中最繁重的一部分,因为这是模型获取用户输入并被调用以执行推理和生成响应的地方。重要的是,我们将运行一个对话,我们可以连续提出多个请求,因此,妥善管理聊天历史并将其作为每个新请求的一部分是很重要的。
12345678910111213141516171819202122232425262728293031323334353637383940
def generate_response(user_input, chat_history=None): if chat_history is None: chat_history = [] # 格式化对话供模型使用 messages = [{"role": "system", "content": system_prompt}] # 添加聊天历史以提供完整的对话上下文 for message in chat_history: messages.append(message) # 添加当前的用户的输入 messages.append({"role": "user", "content": user_input}) # 分词:将消息转换为模型的输入格式 prompt = tokenizer.apply_chat_template(messages, tokenize=False, add_generation_prompt=True) inputs = tokenizer(prompt, return_tensors="pt").to(device) # 生成响应:此部分首次执行可能需要一些时间 with torch.no_grad(): outputs = model.generate( **inputs, max_new_tokens=512, do_sample=True, temperature=0.7, top_p=0.9, pad_token_id=tokenizer.pad_token_id or tokenizer.eos_token_id ) # 解码生成的响应 full_response = tokenizer.decode(outputs[0], skip_special_tokens=True) # 仅提取助手的响应,而不是完整的原始输出 assistant_response = full_response.split(user_input)[-1].strip() # 如果响应包含角色标记或其他伪影,则进一步清理 if "assistant" in assistant_response.lower()[:20]: assistant_response = assistant_response.split(":", 1)[-1].strip() return assistant_response
在定义了生成响应的关键函数后,我们可以构建一个简单的用户界面来运行和与助手进行交互。
该界面将包含一个输出显示区域,用于显示对话;一个输入文本框,用户可以在其中提问;以及两个按钮,用于发送请求和清除聊天。请注意这里使用了 widgets 库来创建这些元素。
123456789101112131415161718192021222324252627282930313233343536373839404142434445464748495051525354555657585960616263646566676869707172
# 创建一个简单的个人助理 UIdef create_assistant_ui(): output = widgets.Output() input_box = widgets.Text( value='', placeholder='问我任何问题...', description="问题:", layout=widgets.Layout(width='80%') ) send_button = widgets.Button(description="发送") clear_button = widgets.Button(description="清空聊天") chat_history = [] def on_send_button_clicked(b): user_input = input_box.value if not user_input.strip(): return with output: print(f"你: {user_input}") # 显示思考指示 print("助手: 正在思考...", end="\r") # 生成响应 start_time = time.time() try: response = generate_response(user_input, chat_history) end_time = time.time() # 清除“正在思考”消息 clear_output(wait=True) # 显示交互过程 print(f"你: {user_input}") print(f"助手: {response}") print(f"\n(响应生成耗时 {end_time - start_time:.2f} 秒)") # 更新聊天历史 chat_history.append({"role": "user", "content": user_input}) chat_history.append({"role": "assistant", "content": response}) except Exception as e: clear_output(wait=True) print(f"你: {user_input}") print(f"生成响应时出错: {str(e)}") import traceback traceback.print_exc() # 清空输入框 input_box.value = '' def on_clear_button_clicked(b): with output: clear_output() print("聊天已清空!") chat_history.clear() # 连接按钮点击事件到函数 send_button.on_click(on_send_button_clicked) clear_button.on_click(on_clear_button_clicked) # 处理输入框中的回车键 def on_enter(sender): on_send_button_clicked(None) input_box.on_submit(on_enter) # 排列 UI 组件 input_row = widgets.HBox([input_box, send_button, clear_button]) ui = widgets.VBox([output, input_row]) return ui
或者,我们也可以为聊天工作流设置命令行界面(CLI)的选项。
123456789101112131415161718192021222324252627
# 使用模型的一种更简单方法的示例(命令行界面)def cli_chat():print("\n=== 正在启动 CLI 聊天(输入 'exit' 退出) ===") chat_history = [] while True: user_input = input("\n你: ") if user_input.lower() in ['exit', 'quit', 'q']: print("再见!") break print("助手: ", end="") try: start_time = time.time() response = generate_response(user_input, chat_history) end_time = time.time() print(f"{response}") print(f"(生成于 {end_time - start_time:.2f} 秒)") # 更新聊天记录 chat_history.append({"role": "user", "content": user_input}) chat_history.append({"role": "assistant", "content": response}) except Exception as e: print(f"错误: {str(e)}") import traceback traceback.print_exc()
几乎完成了。我们将定义最后两个函数。
- 一个是用于进行快速测试,以确保模型和依赖项都已正确设置。
- 一个是用于运行整个对话式助手应用程序的总体函数。在这里,用户可以选择要使用的界面类型(UI 或 CLI)。
123456789101112131415161718192021222324252627282930313233343536373839404142434445464748
# 尝试一个简单的测试查询,以确保一切正常def quick_test(): test_question = "你能帮我做什么?" print(f"\n测试问题: {test_question}") start_time = time.time() try: response = generate_response(test_question) end_time = time.time() print(f"响应: {response}") print(f"生成时间: {end_time - start_time:.2f} 秒") return True except Exception as e: print(f"测试失败,错误为: {str(e)}") import traceback traceback.print_exc() # 打印完整的堆栈跟踪以进行调试 return False # 运行我们的应用程序的总体函数:我们可以在这里选择使用哪种界面def run_assistant(): print("\n正在运行快速测试...") test_success = quick_test() if test_success: # 询问用户他们偏好的界面 interface_choice = input("\n选择界面(1 为 UI,2 为 CLI):") if interface_choice == "2": cli_chat() else: print("\n正在启动个人助手 UI...") assistant_ui = create_assistant_ui() display(assistant_ui) # 使用说明 print("\n--- 说明 ---") print("1. 在文本框中输入您的问题") print("2. 按 Enter 键或点击“发送”") print("3. 等待助手的响应") print("4. 点击“清除聊天”开始新的对话") print("----------------------") else: print("\n由于测试失败,跳过 UI 启动。") print("您可能想通过直接调用 cli_chat() 来尝试 CLI 界面") # 运行对话式助手run_assistant()
试用
如果一切顺利,现在是时候享受并与我们新构建的助手进行交互了。以下是对话工作流程的示例摘录。
正在运行快速测试...
测试问题: 你能帮我做什么?
响应: 1. 常识:我可以提供关于广泛主题的信息,从历史、科学到流行文化、时事等等。
2. 解决问题:需要解决数学问题、弄清楚如何做某事或排除故障?我将指导您。
3. 研究:如果您有特定的主题或问题,我可以帮助您找到可靠的来源并为您总结信息。
4. 语言帮助:需要写作、语法、拼写或翻译方面的帮助?我可以协助您。
5. 有趣的事实和冷知识:想用有趣的事实给您的朋友留下深刻印象,还是只是想找点乐子?我都能满足您!
6. 时间管理和组织:帮助您跟上任务和项目的策略。
7. 个人发展:关于学习新技能、设定目标或管理情绪的技巧。
只需告诉我您需要什么,我将尽力为您提供帮助!请记住,我并不总是能给出所有答案,但我一定会努力使过程尽可能愉快和信息丰富。
生成时间: 18.04 秒
选择界面(1 为 UI,2 为 CLI)
以下是通过 UI 进行实时交互的示例。
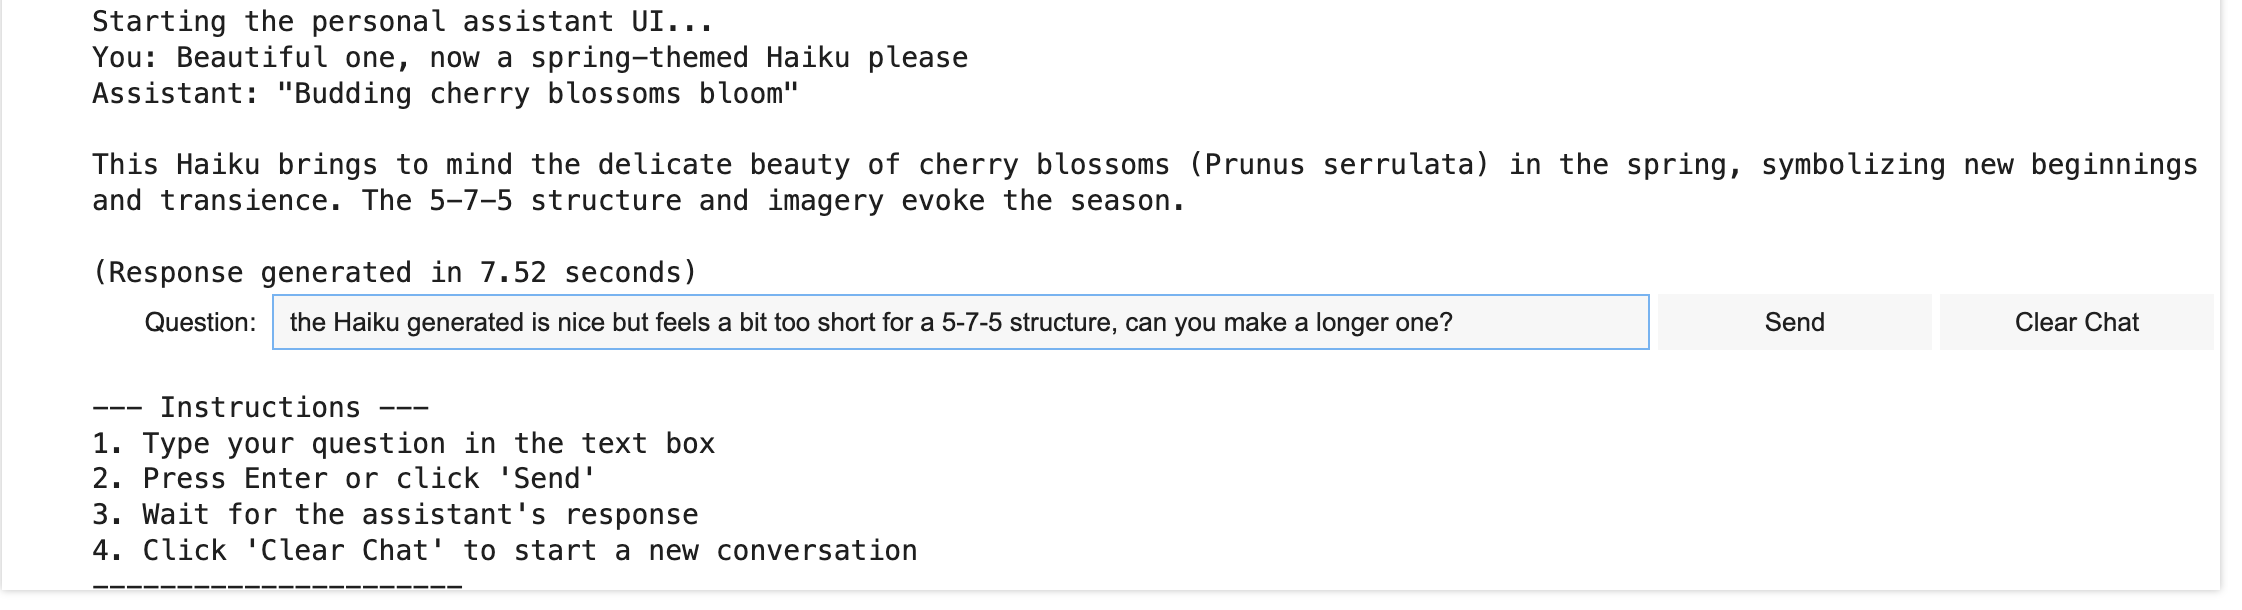
基于 Qwen 的对话式助手的 UI
作者提供图片
结论
在本文中,我们演示了如何构建一个由轻量级但功能强大的 Qwen 语言模型驱动的简单对话式助手应用程序。此应用程序旨在在 GPU 环境(如 Google Colab 笔记本环境提供的)中高效运行和试用。


暂无评论。